Use FTP Software to Automate File Upload / Download
Maintaining a website is challenging and time consuming. If you manage website, you need to repeatedly transfer data from your PC to a web server. You may also need to transfer data between two servers. With Auto FTP Manager, you can easily automate the upload and download process.
Usually webmasters are the ones who need to transfer their files to FTP server consistently to keep their websites updated. On automating this process, there is a possibility of sites getting cluttered due to some redundant files on the server or PC.
The key to proper site maintenance lies in managing these contingencies and dealing with them immediately. This is accomplished using a set of pre-defined rules called 'Action Rules' in combination with automated transfers.
Let's look at a few common scenarios that occur during file transfers, and how Action Rules helps manage them:
Local File/Folder is not Present on the Server
It's a good idea to keep the contents of remote and local folders identical for easy maintenance.
Consider this hypothetical situation:-
A web site with tens of pages modifies its content daily. New pages are constantly created and saved in the local folder to be subsequently uploaded to the remote folder. A few, new pages might not be uploaded in time, even though they're ready for transfer. This could hamper the efficiency and productivity of the site.
Specifying Action Rules
Action Rules can be defined while creating an Automated Transfer Profile. A profile consists of information regarding the connection details, folders to synchronize, files to be included or excluded during transfers and other customizable options.
The solution is quite simple. The process of transfer from local to remote folder can be automated. When you create an Automated profile, you can specify the action rules. Right click the profile and select Edit Profile >> Action Rules. Enable the option "Transfer file from <Folder 1> to <Folder 2>", where <folder 1> is on your PC and <folder 2> is on the remote server.
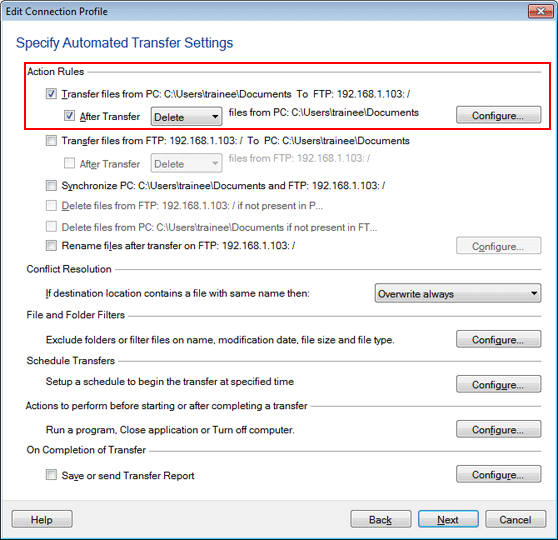
Enable the option After Transfer Delete files from <Folder 1> if you do not want the file anymore after the upload. This allows a better space management on the local side.
Remote File/Folder is not Present in the Local Folder
The files present on the server but not on your PC can be transferred instantly to your local folder. This process is nothing but downloading files. Enable the option Transfer file from <Folder 2> to <Folder 1>. As soon as you transfer your files you can remove them permanently from the remote location by enabling the option After Transfer Delete files from <folder 2>.
Conflict Resolution
A conflict occurs when a file to be transferred is present in both, the source as well as the destination folder. This can be overcome with the help of conflict resolution options that save you the trouble of deciding which file to keep and which one to replace. The 5 conflict resolution options are:
- Append date and time: The transferred file is renamed with the current date and time appended to its name.
- Overwrite always: With this option the transferred file replaces the existing file.
- Overwrite if date is newer: If the transferred file was created after the existing file, the old file is replaced with the new one.
- Overwrite if size is larger: If the size of the transferred file is greater than the existing file, the smaller file is replaced by the larger one.
- Overwrite if date/size is different: The transferred file replaces the existing one if their size and modification dates do not match.
- Skip file transfer: The file is not transferred i.e. no action will take place.
Filters
By default, all files are included in the automated transfer process. If you want to include only certain type of files in the transfer process or exclude some file types, you can set filters. Simply select the Include or Exclude option and specify the File Type you want. You have other advanced filtering options like Modification Date, File Size, and File Name.
With Auto FTP Manager's well-configured Action Rules in place, you can concentrate on the core business of running the web site instead of getting bogged down by manual maintenance tasks.