|
Automated Transfer Rules
Automated Transfer Rules
Automated Transfer Rules tells Auto FTP Manager what
operations to perform while executing an Automated Profile.
While creating a profile, define all the rules and let
Auto FTP Manager execute the profile according to these rules. In the Automated
Transfer rules, you can:
- Select the actions to perform such as Transfer, Transfer and move,
Transfer and Delete, Synchronize or Delete. Delete options helps you to choose which files
to delete.
- Rename the files after transfer on destination using rename rules.
- Decide the Conflict resolution method that needs to be applied when file
with same name is already present at the destination location.
- Include only important files by configuring filters. Auto FTP Manager will choose only these files
for the automated process.
- Run the same profile at a particular time by configuring the schedule.
- Select actions to perform before or after completion of transfer or turn
off computer once the automated transfer is completed.
- Save and send the transfer report once Automated process is completed.
To add different Automated Transfer Rules to your
automated transfer profile, right click the profile and select Edit
Connection Profile >> Transfer Rules. You can specify any or all of
the following Action Rules:
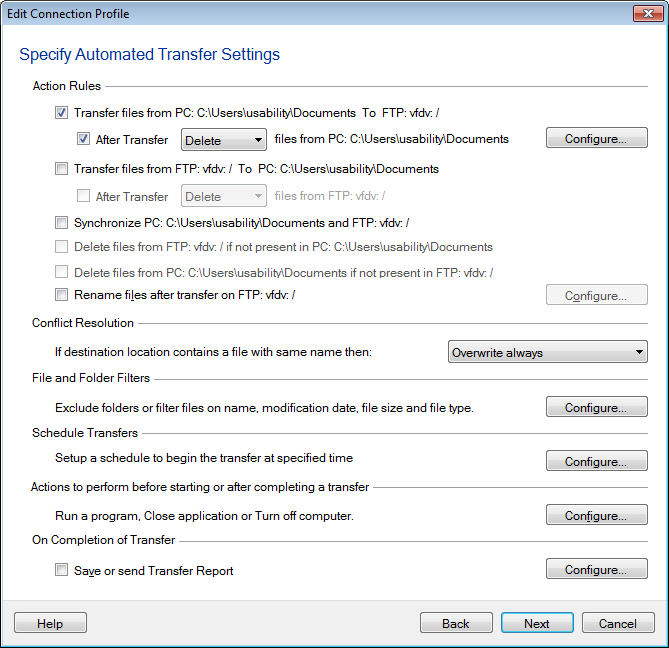
Action Rules
In an Automated Transfer Profile, Action Rules tells
Auto FTP Manager what operation to perform and to which location.
-
If the option Transfer files from
<Folder 1> To <Folder 2> is checked then all
files present in Folder 1 are transferred to Folder 2. You can even
choose to Delete files from <Folder 1> After Transfer or
Move the files to different location of your choice. You can choose to
delete specific files after transfer.
-
The rule Transfer files from <Folder
2> To <Folder 1> transfers files present on
Folder 2 to Folder 1. You can choose to Move the files that are
transferred to another folder by clicking the Location button. If
you do not require the transferred files anymore, Check After Transfer
option and select delete option from the dropdown.
-
When you run an automated profile with
Synchronize <Folder 1> and <Folder 2> option,
it makes sure that the files present in both the folders are exactly
same. If the files are not present in one folder then they are
transferred from the other folder. This option is automatically selected
when you check both the previous action rules.
-
You can have Auto FTP Manager delete files from the
target folder if they are not present in the source folder. For
instance, if Folder 2 contains a file named "Extrafile.txt" which is not
present in Folder 1, then selecting the option Delete file from
<Folder 2> if not present in <Folder 1> deletes
the file Extrafile.txt when you run the Automatic Transfer Profile.
-
The rename rules
changes the file name on destination <Folder 2> after
transfer as per the configured rules. All the selected rules will be applied
to filename sequentially.
Note: <Folder 1> and <Folder
2> will be replaced by your computer's name and the IP address of the
server. You must note that the actual names of <Folder 1> and
<Folder 2> will be used by the program.
Conflict Resolution
Suppose, you want to transfer a file from your PC to
the server. If the file is already present on the server, there will be a
conflict. Auto FTP Manager has a way to resolve this conflict easily with the
help of Conflict Resolution rules.
Auto FTP manager provides the following conflict
resolution options for files:
- Append Date and Time: The transferred file is renamed with the
current date and time appended to its name, thus making the file transfer
successful.
- Overwrite always: The file in the destination folder will be
replaced by the one in the source folder.
- Overwrite if date is newer: If the file being transferred was
created after the existing file, then the old file is replaced with the new
one.
- Overwrite if size is larger: If the size of the transferred file is
greater than the existing file, then the smaller file is replaced by the
larger one.
- Overwrite if date/size is different: The transferred file replaces
the existing one if their size and modification dates do not match.
- Skip: The file will not be transferred which means no action will
take place.
Note: Same Conflict Resolutions will also
applied to the location you choose to move files after transfer.
File and Folder Filters
To prevent some files and folders from transfer, you
can exclude them or add filters on Modification Date,
File Size, File Name and File Type.
With Auto FTP Manager, you can schedule sets of transfers to run anytime you
wish. Schedule each profile to start transfer automatically, either on a Daily,
Weekly or Monthly schedule, for a one-time event, automatically on program
launch or on Folder Change.
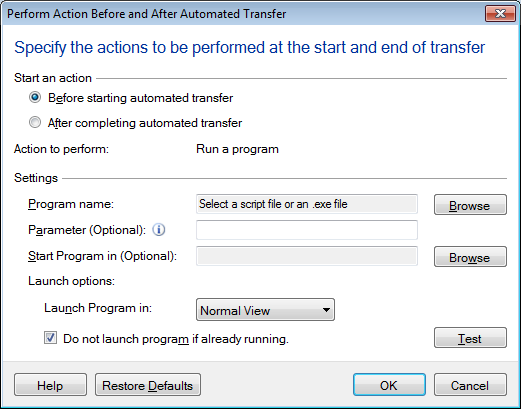
You may want a specific action to be executed before
or after a file transfer. You can configure actions such as run a particular
program, close the application or turn off a computer.
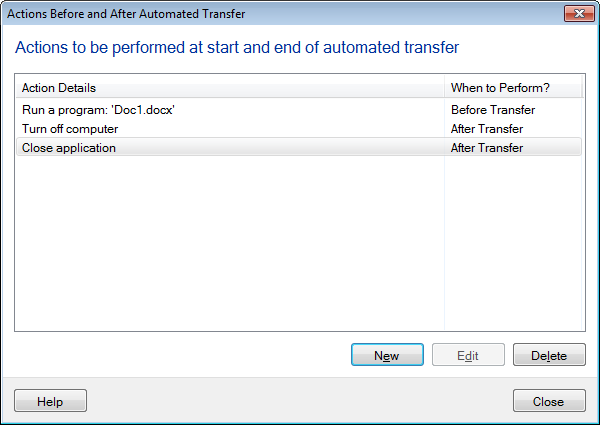
You can view the execution status of all the
configured actions. Configured actions and time of execution will be shown as
below:
Once the Automated Profile is executed, you can set
Auto FTP Manager to perform following operations:
- Save transfer report: You can choose when the transfer report
should be generated. You can save a complete report in the form of a html
document listing all the important events about the transfer. The report can
be saved to your PC, a network drive, or an FTP server. In addition,
there is also another option which allows you to send the report as an email.
When you click configure, the following
dialog will open:
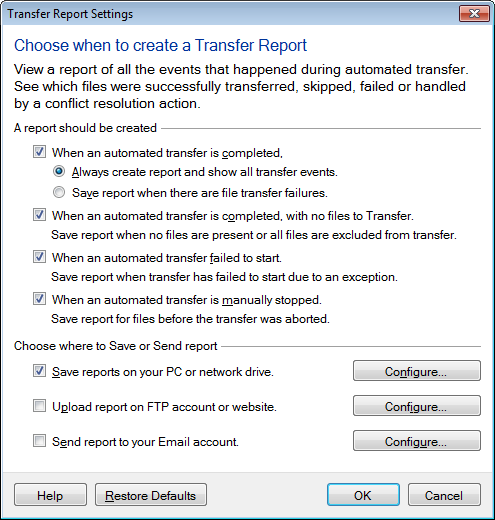
You can choose to save every report or just the one
that was created when a file transfer failure occurred. Save location:
Decide the location for saving the Transfer reports. You can choose any one or
all of the following locations
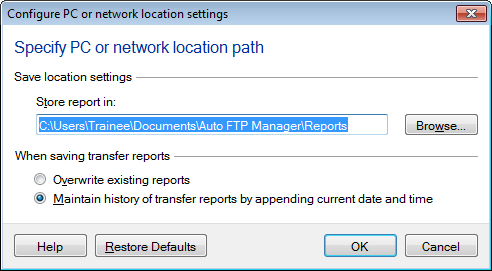
-
PC or network driveBy default, the
transfer reports will be saved on your PC in Documents >> Auto FTP
Manager >> Transfer Reports. You have the option to change the default
folder by clicking on Browse.
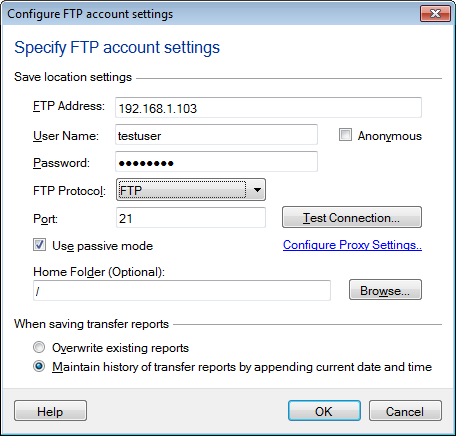
-
FTPA remote location is always the
safest option to save the important data. Your transfer report can be
saved on FTP server. You just have to specify your FTP connection
details and your transfer report is protected. FTP connection details
include the server name or the FTP address, username, password, port number,
and destination folder on the server.
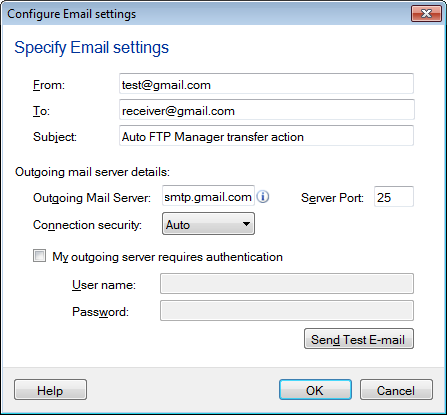
-
EmailIf you chose to send the report
as e-mail, enter the mail details. Mailing Information requires
you to specify the email addresses of the sender and the receiver. You
can include multiple receivers separated by a comma.
When saving transfer reports If you transfer
files more frequently and are interested only in the latest transfer report,
then choose the option Overwrite Transfer reports. Every time you
perform automated transfer actions, the previous report is replaced with the
new one. You can keep a track of all the reports by not deleting the
previous one. Enable the option Maintain history of Transfer reports
by appending current date and time.
|