Uploading Media Files
My Screen Recorder Pro helps you to quickly transfer recorded media files to your FTP account. To start uploading, click Tools >> Upload.
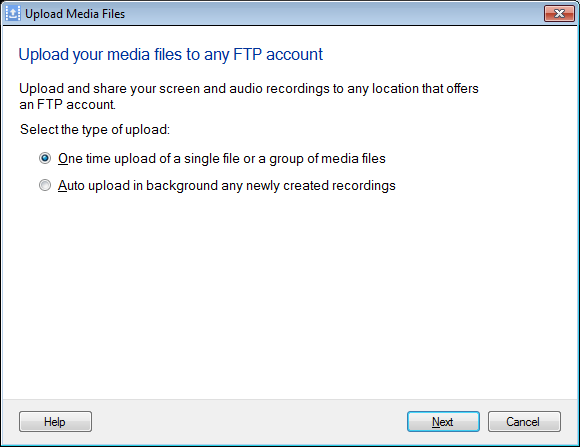
The first step is to specify the method of upload. You can choose One time upload of a single file or a group of media files option and perform a quick transfer or select Auto upload in background any newly created recordings option and let My Screen Recorder Pro automatically upload a file according to the settings configured.
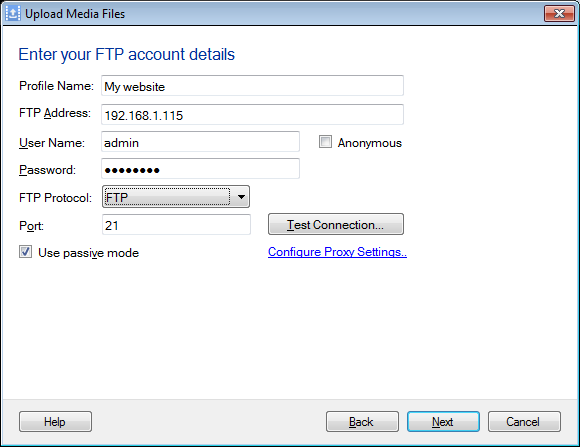
Before adding the Media Files, you need to configure FTP account details.
Fill in the details such as the Profile name, the FTP address where you want to upload your files, choose FTP, FTPS or SFTP Protocol through which you want to send the files, the login information needed to connect to the specified FTP server such as Login name and Password and the port number to connect to the server.
Check Anonymous login if you are uploading to a server that doesn't require individual accounts with passwords.
Note: Files uploaded to an anonymous FTP server are generally visible to and downloadable by anyone.
It is recommended to disable the Use Passive Mode option, unless the application is unable to log in to your server.
The computer may connect to the FTP server via a proxy. If your computer connects to the FTP server via a proxy, you can configure the proxy settings using the link Configure Proxy Settings (Optional). Confirm, if the connection to the specified FTP server can be established or not, by clicking the Test FTP Connection button.
If the type of upload is Auto upload and the option selected is Auto Upload in background any newly created recordings option then on clicking on Next button, Final wizard will shown to configure the settings for Auto Upload.
Select Upload my recording after it is created to my default FTP account option to enable the Auto Upload functionality. If this option is unchecked then no files will be automatically uploaded in background. Selecting the option When saving my recordings, let me choose the FTP account or skip the upload allows you to confirm before uploading.
Profile defines how to connect to a FTP server and where to copy files to. Choose an existing Profile from Select FTP profile dropdown or create another Profile using Add button.
Click on Edit button, and update the existing profile details or delete the profile from the application.
You may select a folder, to upload files on the server by clicking the Browse button.
If the type of upload is One time upload and the option selected is One time Upload of a single file or a group of media files then on clicking on Next button, you can select the type of profile, add a new profile, edit an existing profile or update the path where files will be saved using Browse button.
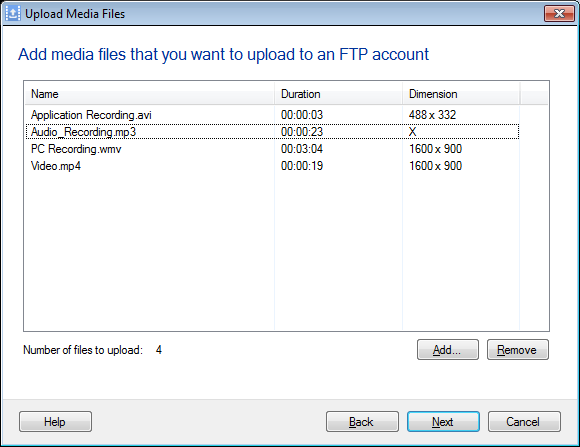
Click on Next button to add the files to upload, with the help of Add button, or by simply drag and drop the files directly into the list.
After pressing Next button, Uploading of all the files starts immediately.
You can view the FTP Transfer Log to get the details of the interaction with the FTP server.
|