Configuring Your PC for Internet Broadcasting
One common use for webcams is to see what's happening at your home, or your business, when you're away. WebCam Monitor makes it easy to broadcast video from one or more cameras. However, as network security becomes tighter, you may have to change your network settings to make the video visible from outside your own local network.
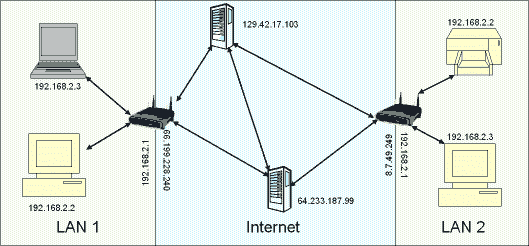
The most common type of computer network today uses the Internet Protocol, almost always abbreviated to "IP". There are two types of IP addresses - Private and Public. The numbers that begin with 192.168.x.x are called Private or Non-Routable IP addresses - and they are only useful inside your network. So your desktop computer might be 192.168.2.2, and your laptop might be 192.168.2.3. Public IP addresses are assigned by your ISP. You can see your Public IP address by visiting http://www.deskshare.com/MyPcInfo.aspx.
A typical home or small office LAN has a router that connects to the Internet. Every other device on the network connects to Internet servers by going through the router. The router in these situations is often called a "firewall".
In order to see a WebCam Monitor video broadcast from outside your network, you need to instruct the router to let certain requests into your network from the Internet.
Because there are so many brands of router that you may be using, we can't give detailed instructions for each. By following the basic procedure shown here you should be able to set up your own router to allow WebCam Monitor video broadcasts to be seen from the Internet.
For most routers, there are two ways to allow the video out of your network: put the computer in the DMZ and use Port Forwarding.
In the special vocabulary of network firewalls, the DMZ is a zone which has no security. All connection attempts are permitted through. If you put your PC in the DMZ, WebCam Monitor broadcasts will be visible from outside, but so will every other network port, which may leave your computer open to system hijackers. Therefore, we recommend that instead, you use Port Forwarding.
Port Forwarding
One aspect of IP networking is the use of different "ports" for different kinds of network service. In Port Forwarding, you will instruct your router to pass along requests that come to the video broadcasting port to your PC, while ignoring other requests.
First of all, you'll need to open the configuration utility for your router. Of course, different companies use different systems, but a common one is to open a web browser and type a particular address into its Address Bar, often 192.168.1.1. You can find out how to do this from the manual for your router, or the manufacturer's web site.
Now you'll need to locate the Port Forwarding configuration for your router. This will look different for every brand and model of router, so don't expect yours to look exactly like the illustration. Some common names for this configuration screen may be 'Virtual Server' or 'Applications'.
You will need to pick a port to forward. WebCam Monitor lets you select any port for broadcasting. The default is port 1040, but when broadcasting using a cable modem or DSL modem to connect to the Internet, we recommend a higher-numbered port, like port 4569.
There are two reasons for this:
-
Most Internet Service Providers now block access to commonly-used ports in order to keep you from running a server in your home while only paying for a consumer account. Ports frequently blocked by ISPs include 25, 80, and 8080.
-
Using a randomly-selected high number port avoids the possibility of conflicting with a port used by other software.
In our example we'll use port 4569.
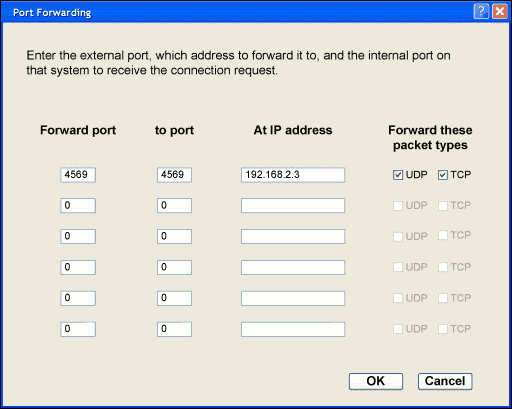
As you can see, when setting up Port Forwarding, you enter the port to forward from the outside, to what computer to forward it to inside your network. Some routers must be restarted before the change in configuration takes effect.
You must also set up WebCam Monitor to use the correct port. You can do that by right clicking on the camera preview and select Edit Camera >> Broadcast.

That should do it.
To connect from outside your network, you need to know what URL to type into your browser. You can find that out by opening a web browser on the machine running WebCam Monitor and visiting http://www.deskshare.com/MyPcInfo.aspx. That gives you your Public IP address. My IP address is shown as 65.119.205.151. To this, you add mms:// at the beginning, and :4569 at the end (substituting your IP address, and the port you selected for 4569). The final URL would look like this: mms://65.119.205.151:4569. Visiting this URL will launch Windows Media Player and begin viewing the broadcast stream.
There are several other ways to remotely view your cameras.
WebCam Monitor gives you the ability to "keep an eye on things" with video broadcasts from your web cameras. Using the tips in this article, you can configure your network and connect from anywhere.