|
|
WebCam Monitor: Upload Settings
Upload Settings
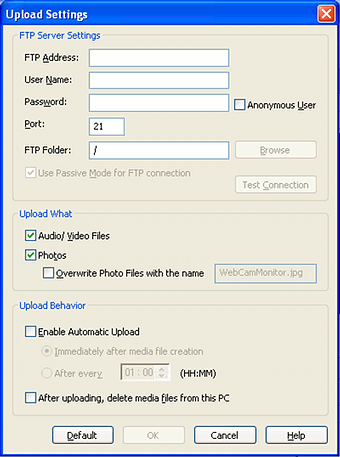
You can have WebCam Monitor upload all recordings to an FTP server, either on your
own network or over the Internet. To open the Upload Settings, click the Configure
button in the Upload Settings area of the Remote Monitoring tab.

In the Upload Settings window, you specify the address of your FTP server,
using either a domain name like ftp.domain.com or an IP address like 111.222.333.444.
You also specify your user name and password, unless this server doesn't require
individual user names, in which case check Anonymous User.
You can also select a folder on the server, to which your recordings will be uploaded.
You can either type the path to the folder or click the Browse button and
select the folder from a list.
When you have entered all the required FTP Server Settings, click Test Connection
to confirm that your settings are correct.
You must also choose what to upload. In the Upload What section, you
can choose to upload Audio/Video Files, Photos, or both (or neither).
If you choose to upload photos, you can Overwrite Photo Files with the name
xxxx. This can be used to create a web page with a regularly
updated still picture of a location.
The Upload Behavior settings let you control when uploads take place, and
what happens after the upload is successful. If you select
Immediately after media file creation, whenever a photo or recording
(whichever you have selected in the Upload What
area) is created, WebCam Monitor will immediately connect to the server and upload
it. If you select Enable Automatic Upload
after every n,
WebCam Monitor will automatically upload all files of the correct type at regular
intervals (for instance, "every 2 minutes"). If automatic uploading is turned
off, files will only be uploaded when you click the Start Uploading button
on the tool bar, or Start Uploading on the Tools menu.
If you select After uploading, delete media files from this PC, each file
will be deleted from your computer after it is successfully uploaded.
You can see the current status of FTP uploads by selecting Show Upload Status
from the View menu.
If you click Restore Defaults, all these settings return to their original
values.
|