Rip Audio CDs
Convert the sound recorded on audio CDs into digital files. Rip your audio CDs to MP3 files and many more formats such as AAC, WMA, WAV, etc.
Click Tools >> Rip Audio CD.
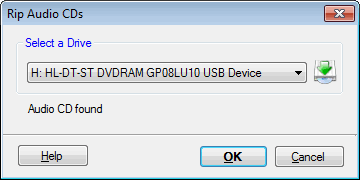
Select the drive that contains the audio CD you want to rip and click OK.

Configure Rip Settings
Your audio CD is by default converted to MP3 files. You can change the format from the Convert ripped files to dropdown. With the Settings button, you can adjust the audio properties such as the frequency, bitrate, audio channel, etc.
Instead of choosing a format from the dropdown, you can select the option Rip audio tracks to Lossless WAV file format. The lossless audio files are great for archiving your music and also as an input file for Audio Editing applications. The music in the converted WAV files is exactly same as that on the audio CD.
To avoid ejecting the CD when conversion is in progress, the option Lock CD when ripping is enabled. If you want to rip several CDs in succession, you can enable the option Eject CD when ripping is done.
File Naming Method
Use File Name Format to choose how you want to name the audio files created. The default setting is suitable —most personal audio players list songs by their title and not the filename.
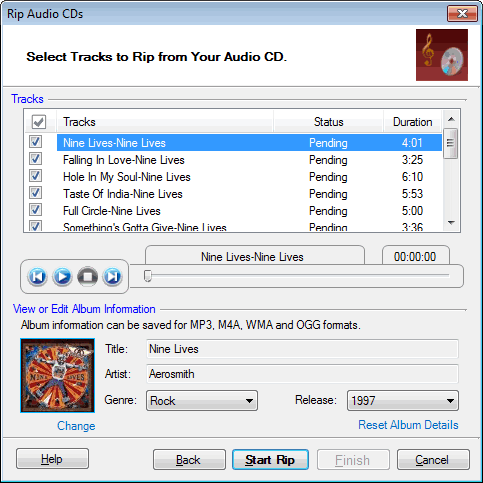
Choose tracks from the audio CD to rip. There is an in-built CD playback control where you can listen to the tracks before you rip. This will help you decide which tracks to rip, especially for CDs whose information is not found online.
Note: If digital CD playback has been disabled, this following message is displayed (message is visible in Windows 2000/XP):

The digital playback is automatically re-enabled, but you have to restart the computer for the change to take effect.
View or Edit Album Information
To get the CD information, Digital Media Converter Pro contacts a database over the Internet and find information like album title, song title, artist name, Genre, Year and its Album Art if available. This may be helpful to select tracks from the list. If no CDDB (Compact Disc Database) is found online then tracks are labeled as "Track 01", "Track 02" and so on.
For MP3, M4A, WMA and OGG output format, the album information is stored in the output file as metadata (ID3 Tags). However, you can edit this information and add your own tags by changing the Album Art, Title, Artist, Genre and Release year.
|