Language:
 
 
Pages:
  
1.Welcome
2.Understanding the User Interface
 
Menus and Tool Bar
Thumbnail View and Camera Layout
Camera Controls
3.Using Security Monitor Pro
4.Triggering Alerts
5.Choose Actions
6.Remote Monitoring
7.Remote Access
8.Scheduling
9.View Recorded Events
10.System Maintenance
11.Application Settings
12.Proxy Server Settings
13.View my Computer IP Address
14.Resources
 

Security Monitor Pro 6.22


Thumbnail View and Camera Layout

Thumbnail view

The Thumbnail strip allows you to quickly see the camera status and previews.  It is shown when you have more cameras that can be displayed by the Preview Layout you have selected. 

Understanding the Thumbnail strip in details:

  • Motion notification: The camera window border will be highlighted in red, as shown below, when motion is detected and highlight camera border is selected. 

  • Thumbnail strip status icons: The status icon allows you to quickly see which actions are running on a camera.  For example, if monitoring is running, then a green status icon will be shown in the camera preview. 

    Monitoring Status icon
    Recording Status icon
    Broadcasting Status icon

  • Drag and drop: To rearrange the camera position in the Thumbnail strip, you can drag the camera preview and drop it within the Thumbnail strip. 
  • Thumbnail strip Navigation buttons: Navigation buttons are visible when you have more cameras than the strip display area.  If you drag a camera preview onto the Navigation buttons, the Thumbnail strip will automatically move in the respective direction.  If you continuously press and hold any of the navigation buttons, the thumbnails will be shifted in the respective direction until you release the button or thumbnail strip reaches the end. 
  • Thumbnail strip context menu: You can start actions for your camera using the Thumbnail strip context menu.  To see the menu, right click on a preview within the thumbnail strip.

Camera Layout

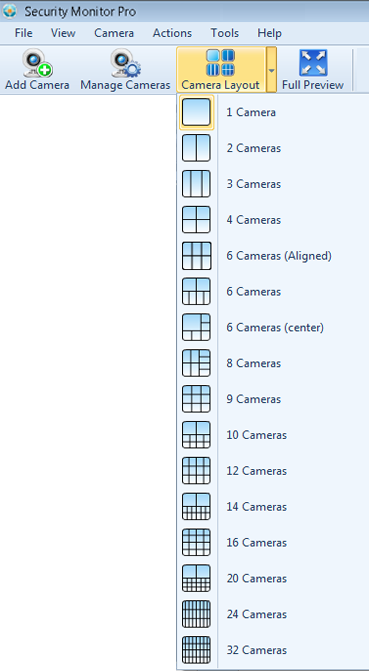
Arrange and logically group the preview windows using different Camera Layouts.  16 different Camera Layouts are supported.  Click View >> Camera Layout or the Camera Layout icon on the Toolbar.

As you add a camera, application will automatically select a best fitted Camera Layout.  This will be helpful as there is a minimum unused space within the Camera layout.  For example, if single camera is added, one camera layout is chosen by default.  When a new camera is added then the layout will be updated and two camera layout is selected and so on.  When you have multiple cameras, you can re-arrange them within the Camera layout by clicking and dragging a camera window into the desired position.

Clicking the Camera Layout icon will toggle the rotation between 1 and N camera layouts, where N= number of cameras.  For example, if there is 1 camera then clicking on Camera Layout will always show the one camera layout.  If there are 2 cameras then clicking on Camera Layout will show the 2 camera layout then rotate to 1 and back to 2 and will repeat.  You can use the pull down arrow to select a different Camera Layout.


Copyright © DeskShare Incorporated.  All rights reserved.