Automated Transfer Profiles
Automated Profile helps you to automate the transfer process. Perform various operations such as Synchronization, Deletion and transferring of files automatically.
You can create an Automated Profile using any of the following ways:
Each Automated Profile consists of Automated transfer rules which defines what files have to be transferred including what action should be performed on these transferred files. For example, you can specify a rule to transfer files from your PC to FTP server and delete those files from the PC as soon as transfer is completed. Click and know in detail about all the Action Rules.
Start Automated Transfer
Once the profile is created, you can choose Start Automated transfer. For an existing profile in the Automated Transfer list, right click on the profile from Connection Profile Panel and select Start Automated Transfer or double click on the Automated profile. Automated Transfer can also be started using the Command Line Interface.
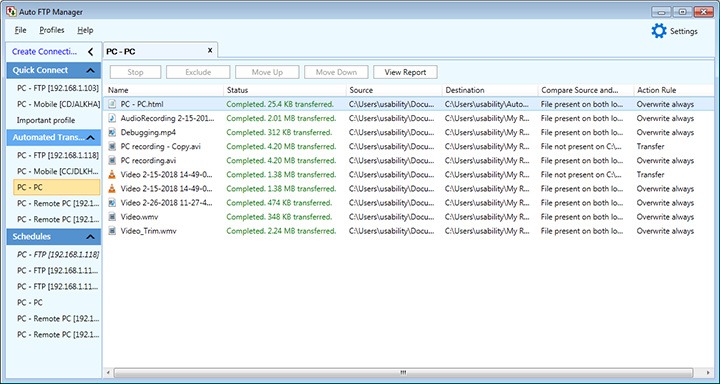
A list of files and folders appears along with its Name, Status, Source, Destination, Compare Source and Destination and Action Rule. The Status shows whether the file is transferred or failed. It also displays the size of transferred file. If any error occurs during transfer then status field shows the error. The Compare Source and Destination displays whether the file is present on both the folder locations or not. The action that you specify in Action Rules may include Transfer, Transfer + After transfer: Delete, Transfer + After transfer: Move, Synchronize, Transfer + Rename, Delete from destination if not present at source or Delete from source if not present at destination. As the files are transferred, the status of the transfer is updated in the list.
If you don't want some files to transfer then select the files and use Exclude option. You can also stop the ongoing transfer process by clicking on Stop button. After clicking on Stop button, you can also rearrange the priority of the files by using Move Up or Move Down buttons to transfer such that files mentioned above in the list view will be transferred first.
Automated Transfer Report
After the file transfer is complete, Automated Transfer Report gives a summary of what actions were performed. Simply click the View Report button and the report appears in your default browser. Automated Transfer report includes following details:
-
A report begins with an Overview which gives information such as Profile Name, Profile Type, Run Status and the Start Time of the Automated Transfer.
-
Connection information such as Path and Location is provided for the two folder locations that were selected for the transferring.
-
The number of files transferred successfully and the number of conflicts resolved are included in the Transfer and Conflict Actions.
-
Delete and Move Actions: The number of files that were deleted or moved are mentioned in this section.
-
Failed Actions: View the total number of files which were unsuccessful in performing the respective action specified.
-
Transfer Actions: A list of files that were transferred from one folder to the other.
-
Conflict Actions: A complete list of files for which Conflict Resolution rule such as Overwrite, Append Date-Time or Skip File Transfer was used.
-
Delete and Move Actions: All the files that were deleted or moved during this automated transfer.
-
Rename Rules: All the rename rules that were applied to filenames during automated transfer.
-
Failed Actions: A list of all exceptions received during the Automated Transfer, and the respective reason because of which the file got failed to perform the respective action[Transfer, Move, Delete or Rename].
To print the report, click the Print this page button at the top or bottom of your browser.
File Transfer Report
You can view the Automated Transfer Report if you chose to save report in the Transfer Report Settings in the Transfer Rules page. Otherwise the report is deleted when you close the Transfer. To view Automated Transfer Report History, select the Automated Transfer profile from the profiles list for which you want to see a report and click File >> Open Transfer Reports You can choose from the Show dropdown to view transfer reports for all profiles or for a particular profile. If you select the profile name then all the transfer reports for that specific profiles will be listed with date and save location.You can save or send transfer report for one profile at different locations including local or network drive, FTP account and email account. File Transfer Report shows the status for each transfer report saved at different location.
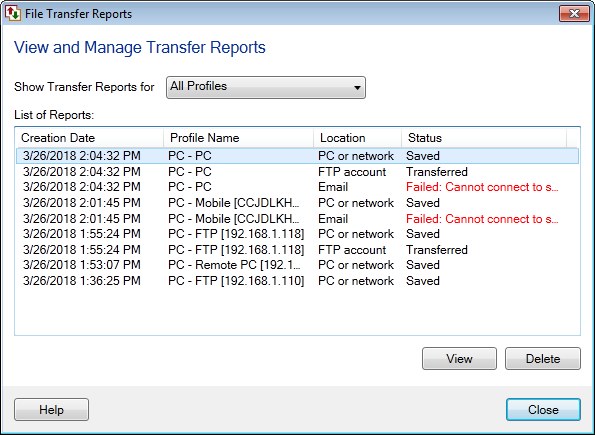
Note: All the Transfer Reports that were previously saved on the Local or Network folder, FTP account and email account will be listed in the File Transfer Reports dialog.
|