|
|
How to Make Good Screen Recordings?
If you are trying to make a presentation and need to capture screen shots as images,
why not capture your entire desktop screen with full motion and add your own voice
narration? My Screen Recorder Pro is the perfect tool for making videos of
your desktop activity for demos, presentations and tutorials. It allows you
to capture your desktop screen activity while you narrate and create AVI files.
Once you have created your dream presentation, you can choose from a wide variety
of distribution options that My Screen Recorder Pro provides. If you want
to distribute via the web you can choose Flash or the Windows Media Format for streaming.
You can also choose to make an executable that can playback without the need of
any media player or other software.
Planning your Presentation
The first step is to have a robust plan for your screen recording session.
To start with, you need to decide whether you want to add voice narration while
recording or to record an application that has sound present.
You may wish to narrate as you record the video. It is always a good choice
to have some sort of script ready, so you can maintain a steady voice and pace while
you record. This script can also contain a sequential list of actions (like
opening particular windows), so you don’t miss out on recording something important.
You can pause and resume the recording anytime by using the shortcut key (F8 by
default). It is a good idea to use a friendly tone, even for corporate presentations.
For recordings where you want to record the audio present in the application itself:
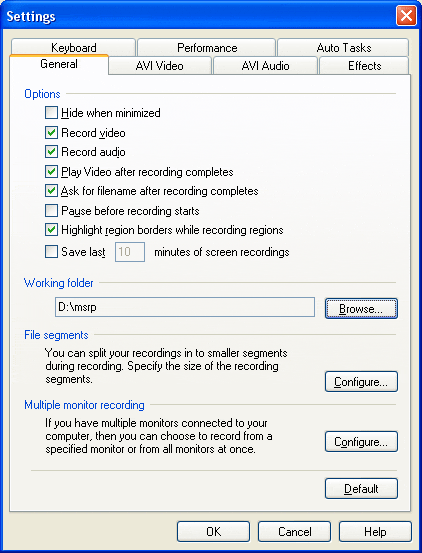
- In My Screen Recorder Pro, on the Tools menu click on Settings.

- From under the General tab, select the options 'Record video' and
'Record audio'.
- Click the AVI Audio tab. Now click on the Configure button.
- If you want to narrate with the recording, select Record from Microphone.
- To record the application's audio, select Record from Speakers.
- Click on Auto Select to let My Screen Recorder choose the best line for you.
While using the Auto Select option, it is recommended that you disconnect the microphone.
- To choose manually, select the Let me select the line option.
It is especially important to confirm these settings when you are recording media
players or other interactive software.
Preparing to record
To get high quality screen recordings, you need to optimize the settings of My Screen
Recorder Pro:
- You first need to decide the resolution at which you want to record. High
resolution recordings played back at lower resolutions will result in image distortion,
and lower resolution recordings will have smaller file sizes. It is generally
best to determine the lowest screen resolution that your recording will be played
back on, and then record at slightly less than that resolution. You can change
your PC's resolution by right-clicking on the desktop and then clicking on Properties
> Settings.
- The next step is to decide the recording size. By default, the Full
Desktop is captured during screen recording. If you want to capture
only specific parts of your screen, then choose the Fixed Dimensions
or Rectangle option, from File > Region.
Choose the Window option if you want to record only a specific
window on your desktop screen. This reduces the file size of the recorded
video. You can also choose to record only a specific window.
- My Screen Recorder Pro records the video in AVI format, which can be edited easily.
However, uncompressed AVI files are inherently large. There are several ways
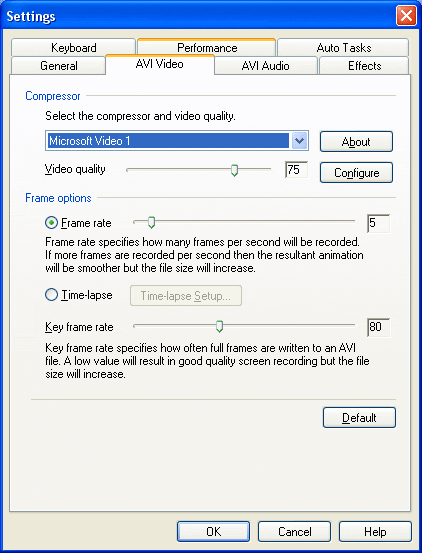
that AVI files can be compressed. You can change the compressor and other
video properties by clicking the Tools menu and then Settings, then
switching to the AVI Video tab. By default, My Screen Recorder Pro
chooses the Microsoft Video 1 compressor, which is ideal while distributing to a
wide audience. The Microsoft MPEG-4 codec is a good choice for high quality
compressions. You can also convert your AVI file to Windows Media Format,
which is much smaller and can be streamed from a website. With Windows Media
Format you don’t have to worry about the viewer having the appropriate compressor.

The Key Frame Rate defines how often full frames are saved. A high
value of key frame rate results in smaller file size but lower quality videos.
The default settings of the frame rate and the key frame rate are optimum for most
types of recordings, but you may try experimenting with these settings for better
results.
The Frame Rate defines the number of frames to play per second.v You can
make it higher if you want smoother playback, especially for videos containing a
lot of motion. However, higher frame rate also results in bigger file sizes.
- For smoother recordings, especially of applications having fast action motion or
media players, disable the hardware acceleration by clicking on the Performance
tab in the Settings window, and then checking the option "Disable
hardware acceleration during recording".
Adding that Professional Touch to your recordings
You can make your screen recordings a visual treat by editing them using
Video Edit Magic. You can adjust your audio narration or add new narration
(or a musical sound track) to your screen recording. Title text and annotations
can be placed anywhere on the video to make your recording easier to understand.
Then you can save your edited recording in the format which best suits your distribution
requirements.
|