|
Menu Bar
The Menu Bar is divided into the following sections:
- File Menu: General operation controls.
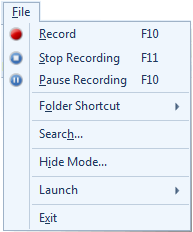 |
- Record: Start recording screen in either Full screen or a Custom Region.
- Stop Recording: When you finish recording, select this menu item to stop your recording.
- Pause Recording: Pause the recording and resume it when required.
- Folder Shortcut: Select a folder to save your screen recordings. Perform folder related operations like: rename, remove, open location.
- Search: Select the folder in which you want to search your screen recordings.
- Hide Mode: My Screen Recorder Pro will run in the background without displaying an icon on the screen or on the taskbar.
- Launch Menu: Launch other DeskShare applications.
- Exit: Stops all the running actions, preserves the previously selected settings for the next use and closes the application.
|
- Edit Menu: Common file management features.
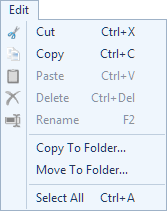 |
- Cut: Move your recording(s) to a different recording folder.
- Copy: Create copies of your recording(s) in a different folder.
- Paste: Paste copied file in the selected folder shortcut.
- Delete: Permanently delete the selected file from the recording folder.
- Rename: Select a recording and press F2 to update the recording file name.
- Copy To Folder: Copy the selected files to the desired folder location.
- Move To Folder: Move files to the selected folder location.
- Select All: Press Ctrl + A to select all the files from a particular recording folder.
|
- Play Menu: Player controls to view the screen recordings.
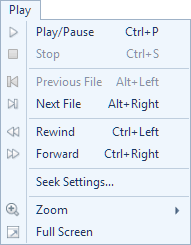 |
- Play: Click the Play button to start watching your screen recording.
- Pause: Play will toggle with pause button. It will stops the play slider at the current point.
- Stop: Stop button stops video playback.
- Previous and Next File: Choose to play the next recording or the previous one in the File List.
- Rewind and Forward: Clicking the Rewind and Fast Forward button sends the play slider backward and forward as configured in Seek Settings.
- Seek Settings: Set the amount of time or frames for a single click of the rewind/forward buttons.
- Zoom: View the screen recording at different magnifications by using Zoom-in and Zoom-out.
- Full Screen: Clicking on Full Screen will hide the toolbar and menu bar. Only the Recording preview area will be visible.
|
- View Menu: Change the view and sort your recordings.
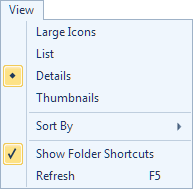 |
- Large Icons: Display icons for each recording file.
- List: Display the recordings in a list.
- Details: Display the size, duration, dimensions, and more for each recording.
- Thumbnail: Shows the first frame of your recording in a small image.
- Sort by: You can sort the recordings using file name, size, date modified, duration, etc
- Show Folder Shortcuts: Toggle the Folder Shortcuts panel to hide or unhide to increase display area.
- Refresh: Press F5 to refresh the list of recordings.
|
- Effects Menu: Apply effects to the screen recordings:
- Tools Menu: Tools menu includes following items:
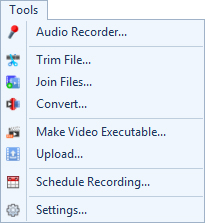 |
- Audio Recorder: Record audio using speakers or microphones, without any screen capture.
- Trim File: The screen cutting tool helps you remove unwanted segments from the recording.
- Join Files: Combine multiple videos into a single file.
- Convert: Convert your screen recordings to WMV, AVI, WebM, or H.264 (MP4) format.
- Make Video executables: Make your screen recordings playable on a PC, without a media player.
- Upload: Upload recordings to your FTP account.
- Schedule Recording: Schedule screen recording to automatically start and stop at a specific time.
- Settings: Configure the general application settings.
|
Toolbar
Toolbar provides a quick access to all the important features provided in My Screen Recorder Pro.
 |
Click on the Record icon to start recording Full screen or Custom Region. The Record button toggles with pause. |
 |
Click to stop the screen recording. |
 |
Trim your screen recordings to remove unwanted segments from your screen recordings. |
 |
Join your screen recordings to view them as a single file in continuous manner. |
 |
Convert your screen recordings to WMV, AVI, WebM or H.264 (MP4) format. |
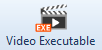 |
Select multiple screen recordings and create a single.exe to play these files. |
 |
Upload your screen recordings to your FTP account. |
 |
Create a schedule that will automatically start and stop the recording. |
 |
Configure the general application settings. |
|