SFTP Settings
The Secure File Transfer Protocol (SFTP) is a secure alternative option for the File Transfer Protocol (FTP). SFTP requires both client and server to be authenticated.
Server Validation is done by validating the Server's fingerprint with the saved fingerprint. Server Fingerprint is server's public key which is the identification of the server you are connecting to.
When you connect to a server for the first time, the fingerprint is not yet saved, so My Screen Recorder Pro has nothing to compare it to, so it will ask you to save before connecting. Once the server fingerprint is saved, for subsequent connections you will not be again asked until the fingerprint is changed by the server.
If the fingerprint has been changed you will be warned and asked if you wish to continue. This is to protect you against a network attack known as spoofing where the attacker secretly redirects your connection to a different computer.
Client Validation is done by server using any of the following authentication methods:
- Password based authentication
- Public key based authentication
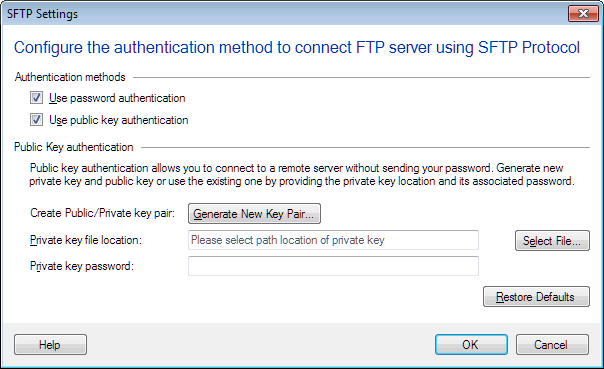
To configure the type of authentication methods, click SFTP Settings button from upload media files wizard.

- Use password authentication: My Screen Recorder Pro sends Username and Password to the FTP server for login. By default, this option is selected.
- Use public key authentication: In this type of authentication method, authentication is done using a pair of keys, a public key which you will have to manually send it to the server administrator and a private key which is used for decrypting.
How Public authentication works
- Step 1: The server encrypts a random number with the server's public key and send it to client.
- Step 2: Client decrypts the number using the private key. If private Key is password protected then the password will be required for activating the private key.
- Step 3: The client sends the decrypted number back to server.
- Step 4: The server allows the connection if the number matches with the previous one sent.
Generate New Key Pair:

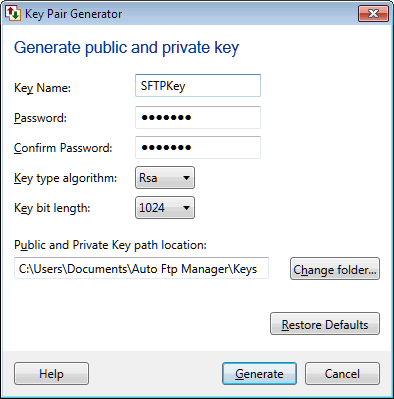
In the Key Pair Generator dialog, you can create your own Public and Private key for SFTP connections.
- Key name: You can specify a name for Public and Private Key. Both Public and Private key will have same name.
- Password: If you want to secure your private key, add Password.
- Confirm Password: If you want to password protect your private key, then both the fields such as Password and Confirm Password must be matching.
- Key type algorithm: Choose the type of algorithm that will be used while creating keys. The default Key type algorithm is RSA.
- Key bit length: Specify the length of the keys. Shorter keys are faster but less secure where as longer keys are more secure but are slow in connections.
- Public and Private Key path location: By default, Keys will be generated and saved on your PC in Documents >> My Screen Recorder Pro >> Keys. You have the option to change the default folder by clicking on Change Folder.
Note: After successful generation of keys, you can now use the newly created Private key along with the Password, if the private key is password protected in My Screen Recorder Pro.
Private Key location: To use your existing private key, specify the complete path where the private key is saved by clicking on the Select File button.
Private key password: If the private key is password secured then specify the respective password.
|