Applying Picture-in-Picture Transition
Transitions like the popular Picture-in-Picture can
be great tools for making your videos unique.
The Picture-In-Picture transition
displays a video clip in
a box within another video.
Both clips play at the
same time.
Traditionally, Picture-In-Picture was
used by big studios and sports broadcasters to show action from two
different angles
simultaneously. Now
you can use
Picture-In-Picture in
your home and
professional videos with
Video Edit Magic.
This article suggests a
few effective ways to
use the
Picture-in-Picture
transition.
Before discussing the possible applications, let us
see how we can apply the Picture-in-Picture transition in Video Edit Magic.
Applying the Picture-in-Picture Transition
You need to have media
sources present in both
video tracks. The
sources can be video
clips or images.
For the transition to work correctly,
the media sources need
to overlap. That
is, they need to be
added so that (for at
least the time the
Transition is in effect)
both sources are
available at the same
time.
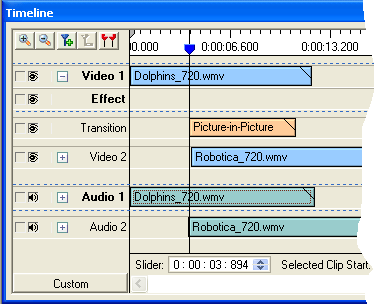
- Position the seek slider on the
Timeline
at a point where
both media files
are present.
In the
illustration
below, that
could be
anywhere
after
the
beginning of
Robotica_720.wmv
and before
the end of
Dolphins_720.wmv.

- Select the Transitions tab.
- Right-click the Picture-in-Picture icon and click on Add
to timeline.
This would place the Picture-in-Picture transition
on the Transition Track
of the Timeline.
Understanding the Transition Properties
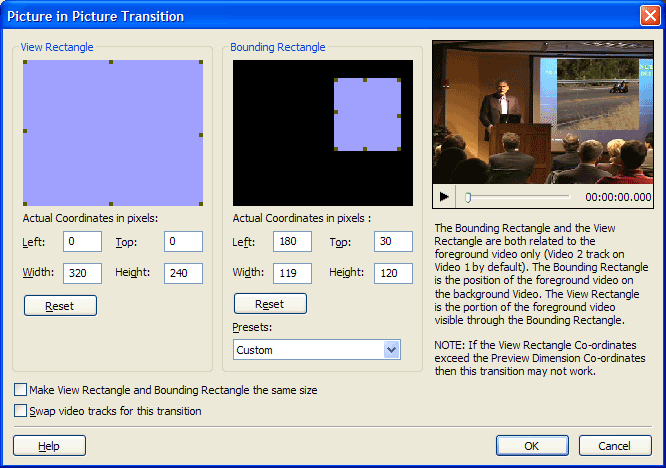
The Picture-in-Picture properties can be configured
by right-clicking on the transition and selecting
Transition
Settings.

The View Rectanglemarks the position
and size of the
foreground image—the one
that appears on top of
the background video.
The size and position of
this rectangle mark the
"mini screen" on which
the smaller video plays.
You can resize and move
it using the mouse, or
specify an exact
position and size using
the Actual
Coordinates in pixels blanks.
The Bounding Rectangle
controls what part of
the foreground video
appears. For
instance, if you resize
this to contain only the
top half of the screen,
only the top half of the
foreground movie will
appear on top of the
background. It can also
be resized using either
the mouse or the
Actual
Coordinates in pixels blanks.
You can also select from the ‘Presets’
options for quick,
repeatable positioning.
If you select
Make
View Rectangle and
Bounding Rectangle the
same size, the
rectangles act as a
"hole" cut through the
background video to show
the foreground video.
Both videos play at full
size, with a piece of
the background video
replaced by a piece of
the foreground.
This could be cleverly
combined with a window
or door in the
background video to
create a stunning
effect.
Possible ways you can use Picture-in-Picture transition
Now that you
know how to add a transition and
adjust its properties,
here are some possible
applications for the Picture-in-Picture transition.
-
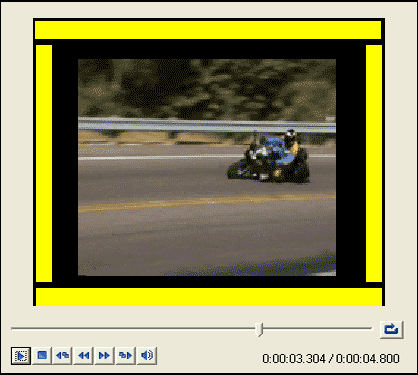
Adding a border
or frame
to your video: To place a border
around your
video clip,
simply find
or create an
image with a
border or
frame and
add it to
one video
track.
This image
will be the
background,
and your
video will
be the
foreground.
In the
Picture-in-Picture
Transition
Properties
window,
resize theBounding
Rectangle so that
only the
border or
frame shows.

- VIDEO WITH A BORDER CREATED WITH PICTURE-IN-PICTURE
Adding a logo
or subtitles:
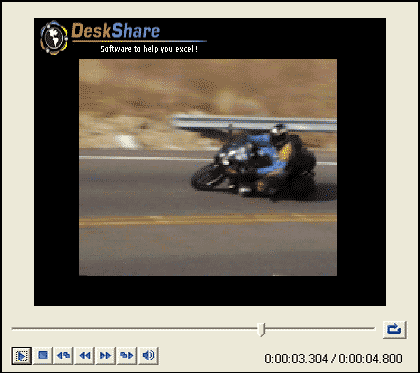
You can use the Picture-in-Picture transition to add a logo or subtitles to
your video. Add the image containing your logo as the background and then
position and resize the Bounding
Rectangle (foreground) to your requirements.

To add subtitles you would need to create multiple images having the dialogs
and use the Picture-in-Picture transition to introduce them during the right
moments in your video. You can also use the Add Text
Effect or the Chroma Key
Color
Transition in Video Edit Magic
to create subtitles.
- Adding an image
to explain a concept:
To make
a unique
vacation
video,
combine an
image of a
map as the
background
with your
vacation
footage in
the
foreground.
You can
used
animated GIF
images in Video Edit Magic.
With a
little
creativity, animated
GIFs and
video
footage can
be mixed
using
Picture-In-Picture
to make
something
truly
eye-catching.
- Narrator box:
You can add
a narrator
to your
video using
Picture-in-Picture.
Just add a
small video
clip of the
narrator in
the
foreground
window.
The
background
would be
your normal
video clip.
If you
choose, you
can delete
the original
audio and
use only the
narrator’s
audio track,
or record a
fresh
narration
using Video
Edit Magic.
An important
use of this
technique is
adding a
sign
language interpreter
to a video
for the deaf.
- Hiding a
portion of a
video
screen:
You can put
a video in
track 2
while
leaving
track one
empty and
apply the
Picture in
Picture
transition. In
transition
settings,
position and
resize the
bounding
rectangle to
the part you
want to hide
and check
the Swap
video tracks
for this
transition option. The
portion you
want to hide
will be
blackened
because the
first video
would be
seen in its
place. Since
there is no
video in
track one,
what appears
is just a
black
screen.
Combining Effects and Transitions
You can use Video Effects and Transitions
individually or
together to create a
captivating spectacle.
Creatively combining
them can go a long way
toward improving your video
productions.
For instance, you could
combine the
Picture-in-Picture
transition with the Pan and Zoom effect.
This would let the
foreground video (in its
rectangle) show only
part of a larger scene
and sweep across it,
while superimposed on
the background video.
You could position the
Bounding Rectangle over
a TV screen in the
background video, and
give the illusion that
the television is
showing your foreground
video (or an image that
you pan across, an
effect Ken Burns uses in
his documentaries).
To do this:
- Add the Picture-in-Picture Transition to the Transition Track between the
overlapping portions of the 2 videos in the Video Tracks.
- Right-click on the
Picture-in-Picture
Transition
in the
Timeline,
and then
select Transition
Settings.
Carefully
position the
Bounding
Rectangle
over the TV
screen in
the
background
video.
(This may
require some
adjusting
and
experimentation.)
Click OK.
- Drag the
top right
corner of
the
Picture-In-Picture
effect to
make it the
correct
duration for
your
purposes.
- Add the Pan and
Zoom Effect to the
foreground
video.
- Right-click on the
Pan and Zoom Effect and then select Effect
Settings. In the Effect Settings
window,
choose start
and end
positions
for the Zoom
effect.
Click OK.
In your
video, the
TV set will
now appear
show a
program in
which the
camera pans
across an
image.
Experiment with
different Effects and
Transitions and invent unique combination.
The uses of the
Picture-in-Picture
transition (and all of Video Edit Magic's
Transitions and Effects)
are limited only by your
creativity. The
Picture-in-Picture
transition can help you
create videos that are
really stand out from
the pack.