Learn the Video Editing Basics
Anyone, even with a little or no experience in editing can, create beautifully edited
videos with Video Edit Magic. Rapid strides in
the fields of multimedia, hardware and software have made video editing easy.
Video Edit Magic is ideal for learning the ropes and taking the first strides in
the field of digital video editing.
This article explains the basics of Digital Video Editing, using Video Edit Magic.
Starting a new Project
The first step is to create a
New Project. The Project file contains
all the information about your project: what media files are used, and where
you have edited (cut, stretched, and moved) them.
To create a new project in Video Edit Magic:
- Start Video Edit Magic.
- In the File menu, click on New Project.
- Click OK.
Importing a video
The next step is to import a video into Video Edit Magic.
You can connect your digital camcorder to your PC, switch on the VCR mode and import
your videos using Video Edit Magic’s Capture DeskShare.utility. You
can also switch your digital camcorder to DV out mode and capture video from it,
live.
To import a video file into Video Edit Magic:
- In the File menu, click on Open file

- Browse to the location where your captured video or any video file is present, select
it, and click OK. You can select multiple files and add all of them
to the Collections window.
Using this procedure, you can add all the files you need to work with to the
Collections
window of Video Edit Magic.
Previewing the imported videos
When you are preparing a meal, it is useful to have all your ingredients and utensils
at one place, so you can get whatever you need quickly. Video Editing is no
different. To work efficiently and effectively, it is a good idea to import
all your videos into the
Collections window, so you know how much footage
you have. The
Instant Preview screen in the top left hand corner shows
the currently-selected video (or image) file for quick recognition.
- Click on the video clip you want to Preview.
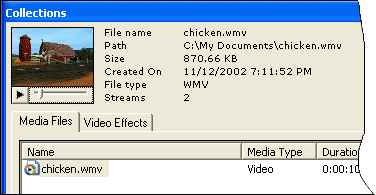
- Click on the Play button under the Instant Preview screen, to get a quick view of
the video clip.
Now, that you have reconfirmed the contents of the video clips and the image files
you have imported into Video Edit Magic, you can roll your sleeves up and start
editing.
Getting videos on to the Timeline
The Timeline is where all editing operations are carried out. With the Timeline,
you can easily see how long a video clip, audio track, transition, or effect is
going to last when the final movie is made. The Timeline lets you see at a
glance what video clips begin when, and how long they last. You are in complete
control.
To add a video to the Timeline:
- Right click on the video clip in the Collections window.
- Select Add to Timeline.
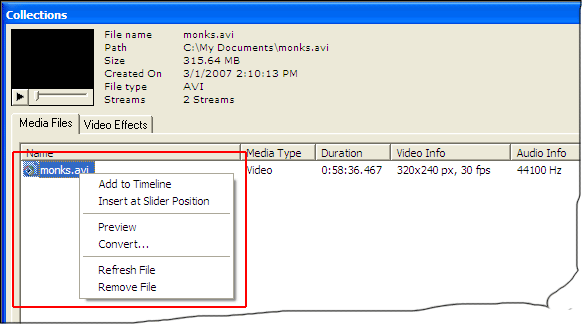
You can also drag the video from the Collections window on to the Timeline
In the Timeline, you can zoom in to and zoom out by clicking on the little buttons
with the magnifying glass icons on them.
Starting with your video editing
Start by trimming unnecessary footage from your video clips. This is extremely
easy with Video Edit Magic. After trimming footage from your video, you will
also be more familiar with working on the Timeline.
To remove a part of your video clip:
- Add the video clip to the Timeline.
- Click on Selection Sliders in the View menu.
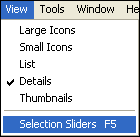
The Selection Sliders are an easy to use graphical tool for editing operations to
be carried out on certain parts of the Movie track. You can delete, copy,
move, cut and paste using the Selection Sliders.
- Select the part of the movie track you want to trim by positioning the Selection
Sliders on the Movie Track of the Timeline.
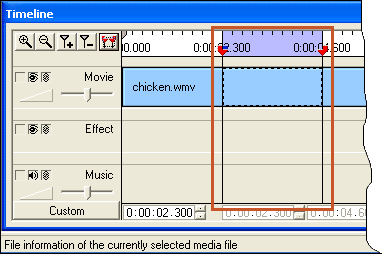
The selected portion is highlighted in lavender color on the Timeline.
- To delete the selected part, simply hit the Delete button on the keyboard.
To copy the selected part, click on the Edit menu and select Copy.
Resizing and moving video clips on the Timeline
You can resize your videos, effects or music tracks by simply selecting them first,
and then stretching them to the new size. However, note that resizing a track
affects the playback speed. If you stretch a video, it will play slower.
If you decrease the size of the video on the Timeline, it will playback faster.
If you resize a video clip to half its size, it will play twice as fast and vice
versa.
To move a complete clip, select it and drag it to the new position.
Undoing operations
All editing operations involve some mistakes. As a beginner, you may need
some time to get it perfect. Video Edit Magic provides you with the ability
to Undo and Redo changes to the Timeline.
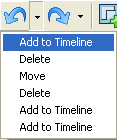
For example, if you want to undo a
Delete operation, just click on the Undo
button on the toolbar. To undo more than one operations at once, you can use
the drop down list the by clicking the down arrow on the Undo button. You
can now select any operation to undo.
Adding Effects
Now, that you have removed all the unnecessary footage and placed your video clips
at the right positions, you can use visual effects to add sparkle and polish to
your video.
Let us consider the Color Balance effect as an example. With the Color
Balance effect, you can adjust the brightness and contrast of your video clips.
- Click on the Video Effects in the Collections window .
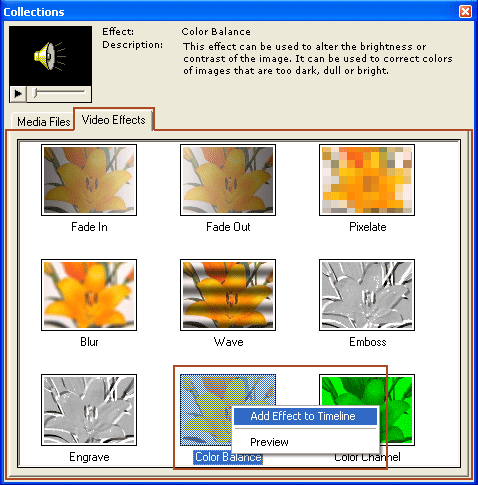
- Right-click on the Color Balance icon and select Add Effect to Timeline.
The effect will be added to the Effect track at the position where the Seek Slider
is. You can then position it anywhere on the Timeline by dragging, and increase
or decrease its duration by stretching or reducing it.
- To specify the Color Balance effect properties, right-click it in the timeline.
Select Effect Settings.
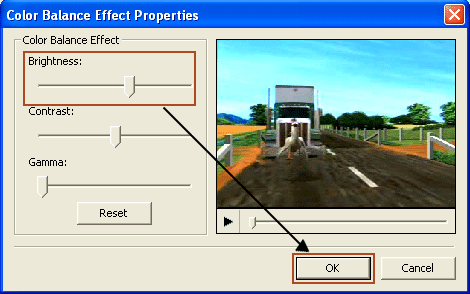
- The Color Balance Effect can change the brightness level to make dark videos
brighter or bright videos darker. It can also change the predominant color
in a scene, for instance compensating for reddish lighting. You can Preview
the effect in the Preview Screen.
- Click on OK.
You can add other effects to your videos in a similar manner.
Working with Audio
Video Edit Magic provides you with a single track to add music to the existing sound
in your video clips. This is ideal for beginners who can feel intimidated
by the presence of multiple and confusing tracks.
You can import an audio file, add it to the Timeline, and position it to start and
end at the desired times. To remove the audio, simply click on the audio track
on the Timeline and hit the delete button.
Making your movie
This is the final step. After you have finished all your editing, Make Movie
combines all the video clips, audio clips, and effects into one movie file.
You can choose to export this movie to your digital camcorder, create AVI format
files (perfect for CD distribution or further editing), or Windows Media Video files
designed for efficient distribution over the Internet.
Before making your movie make sure that the Selection Sliders are hidden.
If they are visible, only the part of the Timeline that lies between them would
be included in the movie.
To make a movie:
- On the File menu, click on Make Movie.
- In Step 1 of the Make Movie Wizard, choose the output format depending
upon your distribution requirements. Click on Next.
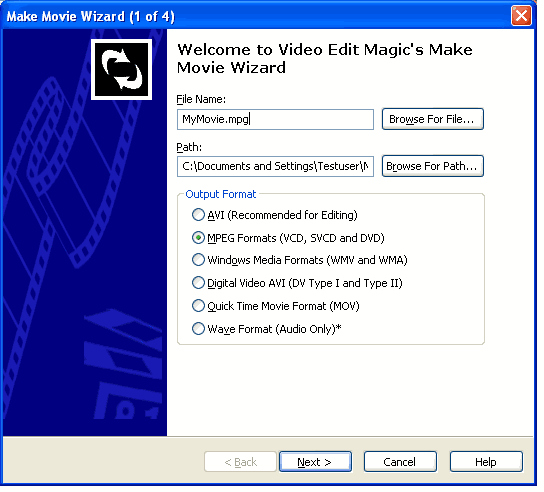
- Specify the output format properties in Step 2 of the Make Movie Wizard. Click
on Next, and then click on Make Movie to start making the final movie.
A final word
Video Edit Magic is the ideal editing tool for getting started with video editing.
Once you are familiar with the editing basics, and feel confident about doing more
with your videos, you might find that Video Edit Magic
gives you more control, more power, and more flexibility.