Adding Titles and Credits to Your Movies
You want to make your
movies look
professional.
Nothing says "real
movie" like having the
movie's title at the
beginning, and nothing
shows how proud you are
of your masterpiece like
having your name in the
credits at the end!
With DeskShare's
Video Edit Magic,
it's easy to add slick,
high-quality title and
credit sequences to your
movies.
In this article you'll
learn how to use the Text effect, and how
to combine this with
other Video Edit Magic
capabilities to create
impressive title
sequences.
Before adding titles
and/or credits, it would
be good if you are
familiar with basic
editing operations like
removing unnecessary
footage,
using effects, and
using transitions.
Adding Text (The
Text Effect)
Before you can add text
to the Video Edit Magic
Timeline, either
a still picture or some
video must be added to
one of the video tracks.
For this example, I'm
going to create a simple
title over a blank,
black background.
To do that, I'll use the
special
Add Text As command
on the
Edit menu
and select
Opening
Title. The
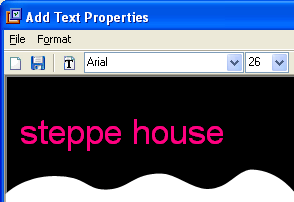
Add Text Properties window opens. This
lets you create and
position your text on
the picture or video.
I'll call the movie
"Steppe House".
I'll use the Format menu
to make the text Arial
Black 36 and yellow, and
place it in the
top-center position in
the picture.

To add the Title to the Timeline, click
the File menu and choose Save and Close.
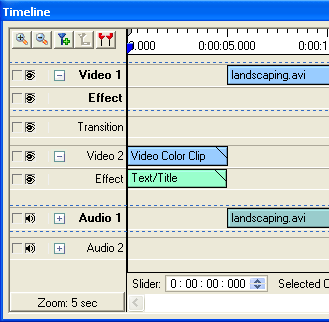
Looking at the
Timeline, you'll see
that Video Edit Magic
automatically added a
Video Color Clip, a
blank piece of video
with just a black
background, to impose
the text over. You
can change the color by
double-clicking the
Video Color Clip.
To add credits at the
end of your movie, you
would use the same
technique, but choose Add Text as -> Closing Credit from
the Edit menu.
Combining transitions
with the
Text/Title
Effect can produce
some impressive results.
I'm going to
Cross Fade from my
title into the movie.
To do that, I need to
move my Video Color Clip
and its associated
Text/Title Effect to
Video Track 2.
Just right-click on the
clip and select
Move
to Video 2, then
drag the Text/Title
effect down to the Video
2 Effect track.
You have to click the
plus sign next to Video
2 to make the
Effect track visible.
Make sure you drag it
against the left edge of
the track to keep it
synchronized with the
clip.

In order to use a
transition, the two
video clips must
overlap. We'll
move the audio and video
clips each back two
seconds. I'll
click on the track in
Video 1 (but not drag
it) and then hold down
the Ctrl key and click
on the track in Audio 1.
I now have both
selected. I can
use the left arrow key
to move them both to the
left at the same time,
and watch the Selected
Clip Start number. I
press the Left key until
they both start at
00:03:00. You must move
both the video and the
audio clip in this
manner to ensure that
the video clip and its
audio start at the same
time and there is no
synchronization problem.

Now, I find the
Cross-Fade transition in the
Transitions tab of
the
Collections window, right-click on
it, and choose
Add
Transition to Timeline.
The default behavior for
a transition is to start
with what's in Video
Track 1, and replace it
with what's in Track 2.
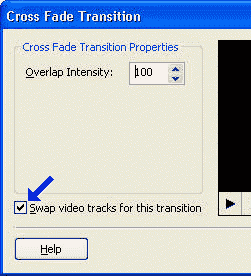
We want to start with
the title (which is in
Track 2), so I check "Swap
video tracks for this
transition"
and press OK.

Now the titles will
gradually fade out and
be replaced by the
movie.
You can use combinations
of Text/Title Effects
and transitions like
Wipes and
Stretch to produce
very eye-catching
sequences.
Adding titles and
credits to your work can
change it from just "a
video file" into a real
movie. Video Edit
Magic's Text/Title
Effect and transitions
let you create
professional, dramatic
title and credit
sequences easily and
quickly.