Editing Techniques to
Remove Unnecessary
Footage
A good video flows from
one event to another.
Including scenes which
are confusing, boring,
or just unnecessary
distracts your audience.
To hold their interest,
you need to remove shots
that don't help to
advance the action, make
your point, or show
something worth seeing.
Video Edit Magic provides you two easy
ways to remove
unnecessary footage:
cutting and cropping.
Here are three common
types of unnecessary
footage in a video
- Moments of
confusion-
When you
start
shooting
your
subjects
(i.e. your
family
members) may
be slightly
confused
about
whether the
camera is
on, should
they start
talking,
etc.
Film of
someone
hesitating
is
unnecessary
footage.
It does not
say anything
about the
video's
story.
- Drawn-out
action-
A video
should
engage the
viewer, with
a sequence
of events
keeping
his/her
interest.
Keeping the
viewer’s
attention is
difficult
when an
event takes
a long time.
While
editing, you
can remove
footage of
long,
drawn-out
actions.
- Filming
problems - If some of
the footage
is shaky,
uses the
wrong camera
angle, or
doesn't
properly
frame the
action, you
will want to
cut it out
and not
include it
in the final
Video Edit Magic makes it easy to remove video footage. Video Edit Magic’s Timeline consists of tracks like video, audio, visual effects and transitions, which can be used for editing. The Timeline is where video and audio clips are placed for editing.
The following controls
can be used for editing.
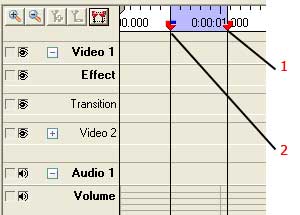
- Selection sliders: To edit parts of tracks,
it is necessary to
select them. To cut or
crop, use the Selection
Sliders to choose the
range you need to
remove. The
sliders Selection
Sliders (with the red
handles) are highlighted
and labeled '1' and '2'
in the above
illustration. If you
want to Cut, Copy or
Crop a particular
section, drag the
Selection Sliders'
handles to enclose a
particular area of the
clip. Any operation
(Cut, Copy, Crop) will
affect the area marked
by the Sliders.
- Seek Slider: To mark a point on the Timeline to preview or Split, use
the Seek
Slider.
Drag the
Seek Slider
(using the
blue handle)
to the exact
location
where you
want to
Split.
The Preview
Window
always shows
the video at
the exact
point on the
Timeline
shown by the
Seek Slider.
When you
Play the
Preview, the
Seek Slider
moves across
the Timeline
to match the
video and
audio being
played.
Now that you
are familiar
with the
Timeline,
you can
begin
editing.
Edit
commands are
on the Edit
menu, except
for Split
Timeline and
Split Track,
which are on
the Tools
menu.
- Cut and Delete- Both Cut and Delete remove footage from the video and audio clips. The difference is that Cut puts the removed footage into the Windows Clipboard, so that it can be Pasted to another location on the Timeline.
- Crop- Cut deletes the selected range in the Timeline. Cropping deletes everything except the selected range. When you Crop, only the portion you have selected using selection sliders is kept. Everything outside is removed. You can select exactly which tracks to crop, from one to all.
 Before
Crop After
Crop
Before
Crop After
Crop
- Crop
Source- Crop Source
works like
Crop,
deleting
what is
outside the
Selection
Sliders.
The
difference
is that Crop
Source only
affects
clips which
are touching
the
Selection
Sliders.
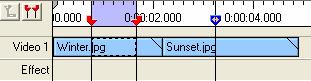
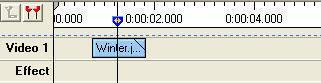
Other clips
are not
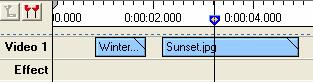
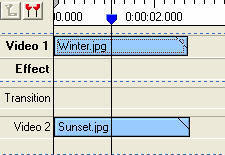
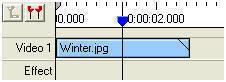
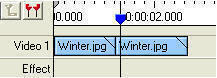
changed. In
the diagram
below, there
are 2 clips
on video
track 1.
The
Selection
Sliders are
only
touching
Winter.jpg.
After Crop
Source, only
the
unselected
portion of
the first
clip is
cut. The
second clip
is
unaffected.
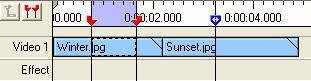
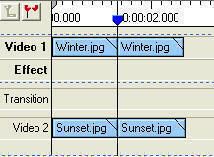
Before
Crop Source After
Crop Source
- Resizing
clips- The starting
and ending
points of a
video clip
can be
adjusted by
just
dragging the
left or
right edge.
Resizing
clips lets
you change
the duration
without
losing any
of the
action in
the clip. Of
course, if
you make a
video clip
shorter by
dragging the
edge, the
action will
be speeded
up. If you
make it
longer, the
action will
slow down
("slow
motion").
Changing the
length of
audio clips
this way
will change
the pitch of
the voices
(higher or
lower).
- Splitting
Timeline- When you
choose to
split the
timeline,
you can cut
any or all
of the clips
that are
under the
Seek Slider.
If you click
the split button or
choose Split
Timeline from the Tools menu, the Which tracks
would you
like to
split? Window
appears. You
can split
any
selection of
tracks. If
you select
all the
tracks, the
result is
much like
cutting a
layer cake,
with cuts
appearing in
every layer.
Before Split
Timeline After Split Timeline
- Splitting
tracks- Split a single clip if you want to use only part of it, or insert another clip between segments of it. Just click Tools, Split Track, and then click the mouse at the point where you want to divide the clip. Once it's split, you can move or delete any portion
. 
Before
Split Track After
Split Track
While Crop removes video
footage across tracks,
Crop Source removes
footage on a single
video clip.
To use
Crop or Crop Source you
can use the following
steps:
- From the File menu, click Open File.
- Select
the media
files that
you want to
edit and
then click
on Open.
- The
media files
will be
displayed
under the Media Files tab of the Collections window.
- Select
track Video 1 or Video
2 where
you want to
place clips.
- Select the
file by
clicking it.
On the Edit menu, click
on Add to
Timeline.
- On the View menu, click
on Selection
Sliders or use the F5 shortcut key
to show the Selection
Sliders.
- Drag the Selection
Sliders from their
handles and
select a
range of the
timeline
that you
want to
retain.
- On the Edit menu, click
on Crop or use Crop Source.
Once you have finished
redundant, boring, or
just unwanted footage,
it's time to take it to
the next level: applying
video effects, using
Transitions, adding
Narration, and more. With Video Edit Magic,
editing can be fun.
Astounding video effects
like
animated transform help you create a
masterpiece
effortlessly.