Split Video
Using the Split Video command, you can divide any movie clip into smaller pieces. Unlike Scene Detection, Split Video lets you choose the exact position to split at manually. This can take more work, but it lets you split a clip at points which are not scene changes.
Only movie clips on the Storyboard can be split. You cannot split movie files in the Video and Photos Collection. You can split clips which were created using scene detection. Still pictures (bitmap images like GIF and JPEG files) cannot be split.
Clips created using Split Video work exactly like any other movie clip, and can be dragged, cut, copied, and pasted. You can add Effects and music to them.
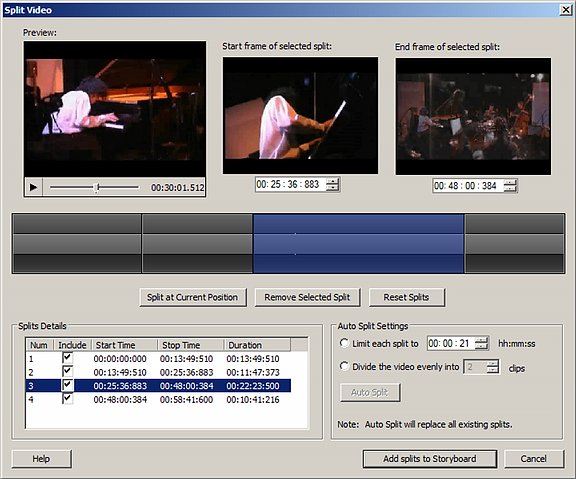
To split a movie clip, right-click on it and select Split Video ... from the menu. The Split window appears.

A "split" is a segment of the video clip, with a defined start time and end time. When the Add splits to Storyboard button is pressed, all Included splits will be added to the Storyboard as separate movie clips, and the original clip that you are splitting will be removed.
There are three ways to create splits:
- The Preview
- The Time Bar
- Auto Split
Splitting Using the Preview
The Preview includes the main Preview area, the Start frame of selected split, and the End frame of selected split. When you click the Split button, the part of the clip that is between the start frame and end frame is marked as a split. You can change the beginning and end times of the split by using the time controls under Start Frame and End Frame.

You can also split the clip at any point by moving the position marker in the Preview. You can move the marker either by dragging it with the mouse, or playing and pausing the preview. Whenever you click Split, the clip is divided at the current position of the marker.
Splitting Using the Time Bar
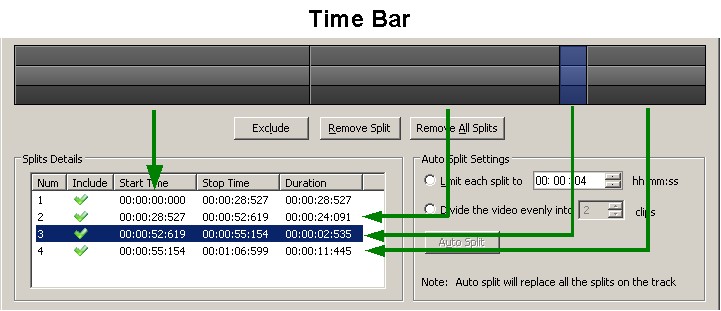
In the center of the Split window is the Time Bar:

In the illustration, the Time Bar shows four splits. Split 3 is selected. Notice that the Time Bar is divided into three layers. The darker-colored outer layers can be used for selection. Clicking on them selected the split you have clicked on. Cliciing on the raised inner layer of the Time Bar immediately splits the clip at that point. You can also select a split by clicking on its line in the Split Details. The selected split is colored blue both in the Time Bar and the Details.
When you move the mouse over the Time Bar, the Preview will display the point corresponding to the position of the mouse. That is, if you have a 2 minute clip, and you move the mouse over the exact center of the Time Bar, the Preview will display the frame at position 1:00 minute.
Splitting using Auto Split
Using Auto Split, you can divide the clip into pieces based on their length. You have two choices:
- If Limit each split to is selected, Auto Movie Creator will divide the clip into pieces of the same size. For instance, if you select "00:01:30" for the hours, minutes, and seconds (hh:mm:ss) of the length, your clip will be divided into 90-second pieces. If it does not divide evenly, the last segment will be shorter than the others.
- If Divide the video evenly is selected, you can cut the clip into pieces that are all exactly the same size. Just choose a number of clips to divide the video into.
Once you have chose your Auto Split Settings, click Auto Split and the Splits Details area and Time Bar will show the new splits you have created. Note: Auto Split will cause any manual splits you have made to be lost.
Include/Exclude
You do not have to add all the splits to the Storyboard. Only Included splits will be added. To Exclude a split, simply select it, then click the Exclude button. If an Excluded split is selected, the button changes to Include, and clicking that will reverse the effect, causing the selected split to be Included and added to the Storyboard.
Removing Splits
To remove a split, simply select it and click the Remove Split button. To remove all splits and start the process over, click the Remove All Splits button. This is different from Excluding a split, in which case it is still marked as a split in the Details and on the Time Bar, but not added to the Storyboard.
Adding Splits to the Storyboard
When you have created and Included your splits, click Add splits to Storyboard. The original movie clip will be replaced by several clips, one for each Included split.
Combining Splits
You can combine some of the splits you have added to the Storyboard into a single clip, which can help when adding effects, narration or music.
|