Titles and Credits
The 'Titles and Credits' option lets you add text to your videos. Click on a text style to see how it looks. You can also right-click on it and select Preview or press Ctrl + P.
Removing and Editing Text
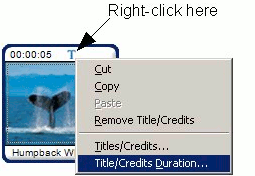
A Titles  icon appears on the clip after text is added to it. Right-click it to Remove Titles/Credits. icon appears on the clip after text is added to it. Right-click it to Remove Titles/Credits.
Adding Text To a Clip
Click on the Titles and Credits button in the Auto Movie toolbar and add text to a clip on the Storyboard by any of the following methods:
- Drag any of the available text styles and drop it on the clip.
- Add text to the selected clip by right-clicking on a text style and choosing Titles and Credits.
- Select a clip and press Ctrl + I.
- Click on a text style, open the dropdown list for the Add to Storyboard
 button and click on Title on Selected Clip. button and click on Title on Selected Clip.
The text style gets added with default text that can be changed from the Titles and Credits Properties dialog.
Adding Text as Opening Title/Closing Credit/Before Selected Clip
Select a text style from the Titles and Credits collection and open the dropdown list for the Add to Storyboard button or right-click. If you select the Title at the Start (Opening Title), Title before Selected Clip or Credit at the End (Closing Credit) option from the list, a blank clip with a colored background is added to the relevant place on the Storyboard. Text is placed on the colored background. All clips on the Storyboard will be shifted automatically to make room for the newly inserted clip.
Title Duration
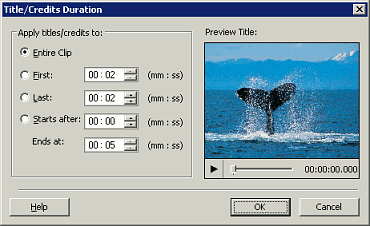
When a Title/Credit is added to a video clip or image in a cellon the Storyboard, you will be asked to choose a duration. You can also change the duration of an existing Title/Credit by right-clicking on the Title icon in the cell and choosing Title/Credits Duration.

To set the duration:
- By default, all Titles will continue throughout the entire duration of their clip. You can choose to have the selected Title exist only for a period at the beginning or end of the clip, or a period in the middle. For instance, if you have a 30 second clip, selecting First and 2 seconds would mean that the text would be superimposed on the clip for the first 2 seconds that it plays. Last 2 seconds would mean that the text would be visible only for the last two seconds. Starts after 10 seconds Ends at 20 seconds would cause the title to appear after the first 10 seconds of the clip had played, and disappear 10 seconds later.

- To see how the clip will look with your changes to the title's duration, click the Play (
 ) button in the Preview Title area. ) button in the Preview Title area.
- When you are finished setting the duration, click OK.
Changing Titles and Credits Properties
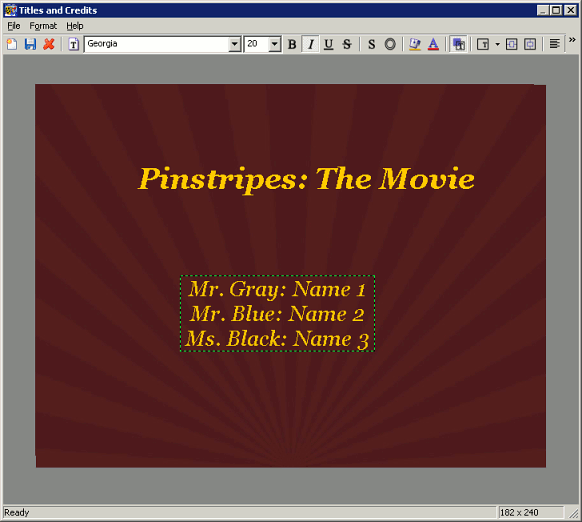
When you add a text style to a clip, the Titles and Credits Properties window opens. It can also be opened by right-clicking on the the Titles icon on a clip and selecting Titles/Credits.

When you are finished creating or modifying your Title/Credit, open the File menu and click Save, use the Save button on the toolbar, or use the shortcut keys Ctrl + S before closing the window using the Close button, or File, Close, or use the shortcut key Esc.
To undo all your changes, open the Format menu and click Reset Settings.
Changing Text
- Double-click on the text or select a text object then point to the Format menu and click Text.
- The text becomes editable. Inititally, all the text is selected, so that if you type, the existing text is replaced by new text. To avoid removing the existing text, click again anywhere in the text area.
- Change the text.
- To apply changes, click outside the text object or use Ctrl + Enter.
Adding Multiple Text
Each Title/Credit can contain up to three text objects. To add a new text object, either right-click in a blank area of the Titles and Credits window and click Add Title Here, or open the File menu and click New Title.
Changing Text Position
To change the text position, drag the text to the new position. To use the preset text positions, open the Format menu and point to Position. Select where on the video to place the text. You can also center the video horizontally or vertically using the Format menu. There are tool bar buttons to
Changing the Text's Background Color
- On the Format menu, click BackgroundColor. Alternately, click the Background Color toolbar button.
- Choose a color that you want to use as the background of the text. Click OK when done. Background color will not be applied if the Transparent Background option is checked.
Making Text Background Transparent
Checking this means that only the text items will appear with the clip on the Storyboard. If the Text Background is not transparent, the image that is part of the text style will also appear. To enable Text Background Transparent, on the Format menu, click Transparent Background. Alternately, click the Transparent Background toolbar button.
Changing Font and Font Size of Selected Text
- On the Format menu, click Font, or right-click on the selected text and choose Font ....
- Choose the Font, Font style and Size.
- Click OK to apply the font changes.
OR
Select the desired Font and Font Size from the drop down boxes on the toolbar.
Changing Font Color
- On the Format menu or the right-click menu, click FontColor. Alternately, click the Font Color toolbar button.
- Choose a color that you want to apply.
- Click OK when done.
Applying Font Styles
On the Format or right-click menu, point to Font Style and select the style that you want to apply to the current text. You can also use the Font Style buttons on the toolbar such as Bold, Italics, Underline and Strikeout.
Applying Font Effects
On the Format menu or right-click menu, point to Font Effects and select the font effect that you want to apply to the current text. You can also use the Font Effects buttons on the toolbar.
|