Working with Clips
You can re-arrange clips on the Storyboard, either by dragging or using the Clipboard.
Selected/Active Clip Cell
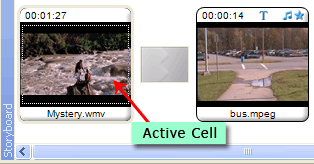
Whenever you right-click on an effect, transition, title or credit or music file and select 'Add to Storyboard', it is added to a clip on the selected cell (the one you click on and which has a dark border around it) or the active cell, the one you last worked on. The active cell has a dotted line around it (see Figure 1).
 |
|
Figure 1: Dotted Line Indicating an Active Clip |
If you add an image, video clip, or transition to the Storyboard when no cell is selected or active, it will be added to the open cell closest to the left edge. If you add a clip to the Storyboard and there is an active/selected cell, the clip would be placed on the active/selected cell. If the active/selected cell has a clip on it, the new clip replaces the existing one and the older clip and all later clips are shifted to the right.
Selecting Clips
You can select one or more clips on the Storyboard to perform various operations like cut, copy, paste, remove, drag and drop etc. To select a single clip, simply click on it. Multiple clips can be selected by clicking in an empty white space near the clips, and dragging the mouse cursor over several clips. To select multiple clips individually, hold down the Ctrl key and click on the the clips you wish to select.
You can drag a clip (or multiple selected clips), using the mouse cursor and drop it to another cell. When you drag a clip over a cell, an insertion mark appears indicating that the clip would be dropped on it once you release the mouse. If the cell already has a clip, the clip would be moved to the next cell. Refer to the image given below.
 |
|
Figure 1: Dragging and Dropping a Clip to Another Cell |
A clip can be dragged and dropped to any cell towards its left on the Storyboard; even the one just before it. When the new clip is dropped, the existing clip shifts to the next cell on the Storyboard. Let us refer to the Figure 2 and Figure 3 and try to understand how dragging and dropping works. The clip 'monks.avi' in Figure 2 is dropped from its position to the second cell which contains the clip 'car.avi'. As you can see in Figure 3, the clip 'car.avi' (and the clip after it) has shifted to the next cell on its right and clip 'monks.avi' has occupied its position on the second cell.
 |
|
Figure 2: Re-arrangement of Clips |
When you drop a clip to the right of its current position on the Storyboard (except for the cell on its immediate right which is not allowed), the clip after it takes its original position. The last clip on the Storyboard cannot be dropped to the empty cell next to it. It is not possible to leave a gap between cells containing clips or images.
Split Video
Video clips on the Storyboard can be divided into pieces using the Split Video command. You can choose precisely where to make the split. This operation is explained in the Split Video chapter of the User Guide.
Image Duration
The amount of time an image remains on the screen can be controlled by altering the Image Duration.
|