Storyboard
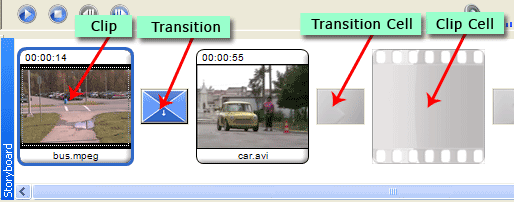
The Storyboard is the area where you create and edit your project. It looks like a film strip. Each scene of the final movie is shown as a clip. Between the clip cells (in which you can place clips/still images) are the transition cells, where transitions can be added. Use the Storyboard to view the sequence of the clips in your project and to rearrange them. You can see the various elements of your project at a glance.
The Storyboard comes has drag-and-drop functionality which makes editing really simple. Everything ( clips, images, music, titles and credits, effects, and transitions ) can be dragged-and-dropped on the Storyboard. You can focus your creative energies on your movies rather than the software.
 |
|
Figure 1: Components of the Storyboard |
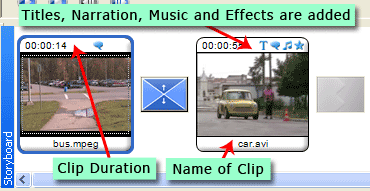
When nothing has been added to the Storyboard, the empty clip and transition cells are gray. When you hover the mouse over them, pop-up help appears telling you what can be added where. Once a clip or image is placed on the Storyboard and you hover the mouse over the top right corner (next to the duration of the clip), you will see grey icons for titles, narration, music and effects. The icons for these features are shown in blue when they have been added to a clip. See Figure 2.
 |
|
Figure 2: Working on a Clip |
After adding files to the collections and creating clips based on scenes, you can drag the clips to the Storyboard. Still images can also be added to the Storyboard. After that, you can add effects and transitions to your media clips, edit them using the cut, copy and paste functions, remove unwanted scenes, and much more.
|