| Email Responder Manager Setup Wizard |
Email Responder Manager Setup Wizard
After you install the Email Responder Manager, the Setup Wizard starts automatically. The Setup Wizard helps you configure, and if necessary create, the Email Responder Database, which will contain all the email, templates, signatures, rules, and other information that are used by Email Responder.
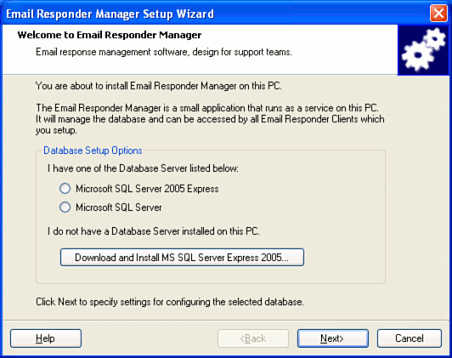
Figure 1: Email Responder Manager Setup Wizard Welcome Screen
If you will be using an existing database server, select the version of Microsoft SQL Server that you have installed and click Next. If you will be installing a new database server for Email Responder, click Download and Install MS SQL Server Express 2005 ....
Installing the Email Responder Database on an Existing Database Server
After you select the correct SQL Server version (Figure 1), the Database Configuration screen appears.
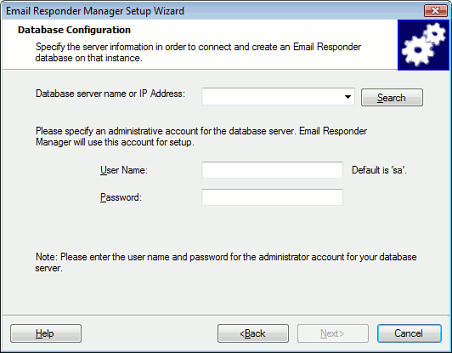
Figure 2: Email Responder Manager Setup Wizard Database Configuration—Existing Database Server
To locate the server to install on, click Search. The Wizard will probe your local computer network and find all the SQL Servers. When the search is complete, all of them will be displayed in a drop-down list, as shown in Figure 3.

Figure 3: Select an Existing Database Server
Select the appropriate server from the list.
In order to create or update the Email Responder database, the Wizard must connect to it using an Administrator account. By default, SQL Server creates an administrator account named "sa". Enter the name of an administrative user in the User Name blank, and the password for that account in the Password area. When you are finished, the Next button will become enabled. Click it to continue. Go on to Configure the Email Responder Database.
Installing SQL Server Express 2005
After you click the Download and Install SQL Server Express 2005 button, the Wizard automatically downloads the SQL Server Express installation file and installs it. Depending on the speed of your Internet connection and your computer, this will take up to 30 minutes. After the database server is installed, the Database Configuration screen appears:
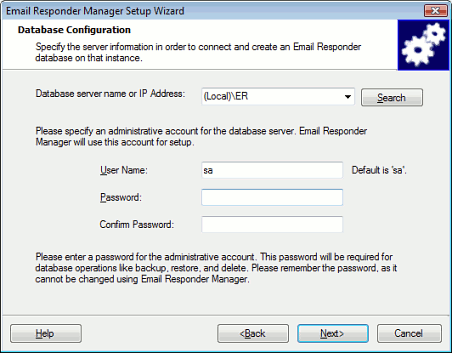
Figure 4: Database Configuration—New Database Server
Now that you have installed the new server, you must create an administrative account. The administrative account will then be used to create the Email Responder database on the server. The information you enter here will also be needed when you back up and restore the database. It is important that you do not lose or forget the administrative user name and password.
The default user name of "sa" is automatically filled in. Select a password and type it both in the Password and Confirm Password blanks. There are rules for the database server passwords which must be followed:
- The password must contain at least 8 characters
- It must contain at least one capital and one lower-case letter
- It must contain at least one numeral (0123456789)
An example of a valid password is MyFlight4.
After you have entered both passwords, click Next to continue.
Configure the Email Responder Database
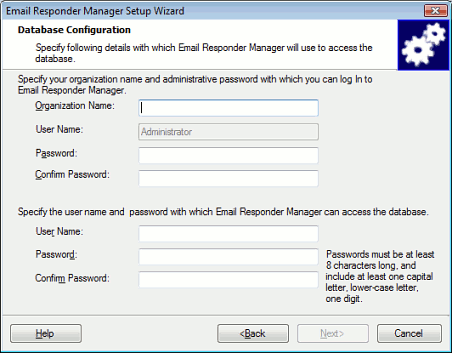
Figure 5: Configure the Database
Now that the database is created, you perform basic configuration steps and specify how Email Responder will access it in the future:
Organization Information
Organization Name: The name of your company or group. For instance, "DeskShare, Incorporated."
Password and Confirm Password: The password you type here will be used to gain access to the Email Responder Manager.
Database Connection Information
In this section, you will create a new user name and password on the database server, which will be used by both Email Responder Manager and the Email Responder clients when connecting to the database. This new account will not be an administrator on the server, which provides increased security.
User Name: Any name you select. Account names cannot contain spaces.
Password and Confirm Password: A password for the new account. This database password has the same restrictions as the administrator password.
Start Email Responder Manager
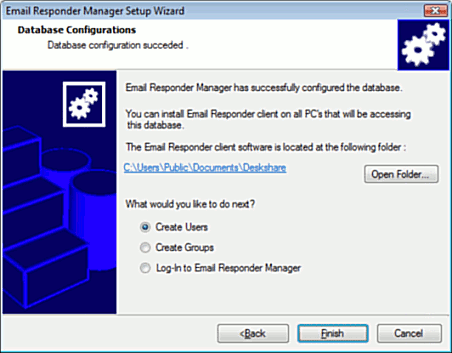
Figure 6: Database configuration succeeded.
Now, choose whether to Create Users, Create Groups, or Log-In to Email Responder Manager, and click Finish to start Email Responder Manager.
|