| Email Responder: The Customer Information Area |
Email Responder: The Customer Information Area
The bottom left portion of the window displays information about a customer. Normally, this is the customer who sent the currently-selected message in the Message List. There are three tabs:
- Sent History
- Contacts
- Notes
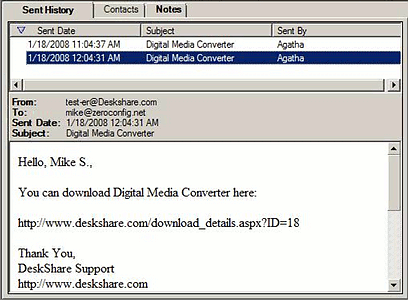
The text on the Sent History and Notes tabs will be boldface only if there is information there. In Figure 1 below, there is a Sent History but no Notes. The Contacts tab is never boldface.
Sent History
The Sent History shows all messages that have been sent to the currently-selected customer.

Figure 1 shows that two messages have been sent to Sally. Clicking on a message in the list shows the contents in the Preview area below. Using the Sent History lets you see what has already been tried in solving a customer's problem.
To see all messages from a particular customer, you can filter the Message List to show only those messages.
Contacts
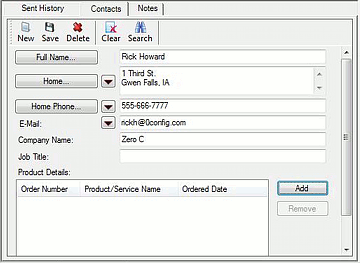
The Contacts tab displays the contact information for the sender of the currently-selected message:

Email Responder automatically extracts as much as possible from email messages. If your organization uses a web form, it's possible to get additional information that isn't normally included in email, such as phone numbers and job titles. As you receive more information (for instance, if the customer tells you his/her mailing address) it is a good idea to copy and paste it into the Contact form, so it will be instantly available to anyone who needs to get in touch.
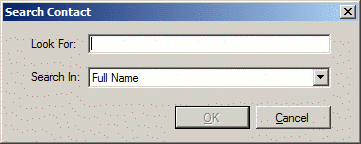
To see information about a contact other than the current sender, click on Search. This window will appear:

You can search the Full Name, Address, Phone Number, Email ID, Company Name, Job Title, Order Number, or Product / Service Name.
If you wanted to find a customer named "Forth", you could type that name into the Look For field and click OK. As you can see in Figure 4, there are three customers with that name:

You can use the arrows to switch between the matching Contacts. When you select a Contact found this way, the Sent History and Notes tabs also update to show information about this customer, not the sender of the selected message in the Message list.
The Contacts Tool Bar
- The New button creates a new Contact (not necessarily based on a received message).
- The Save button can be used to save your changes once you have created a Contact, edited one, or used the Clear button.
- Delete deletes the current Contact from the database.
- Clear removes all data from the Contact, leaving it blank. (Unless you click Save, these changes are not permanent.)
- Search lets you find a contact, as described above.
Notes
The Notes tab lets you store any information about the customer that doesn't fit on the Contacts tab. One very common use of Notes is recording non-email communications. When a customer calls on the phone, it's a good idea to create a Note describing the call. Notes can also be used for anything else that you want to remember later or let other customer service representatives know. For instance, "Ted is hard of hearing, so speak loudly" would be an appropriate Note.

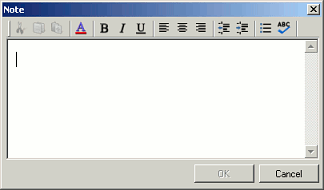
To create a Note, open the Notes tab and click the Add button. The Note window opens:

Type your Note and click OK. You can edit an existing Note by selecting it and clicking the Edit button, or by double-clicking on it. Finally, you can delete a Note by selecting it and either pressing the Del key on your keyboard, or the Delete key in the Notes toolbar.
|