| Email Responder: Sending Mail |
Email Responder: Sending Mail
To create a new email message, click the New button ( ) or File, New, E-Mail Message, or use the keyboard shortcut Ctrl+N. The Mail window appears. ) or File, New, E-Mail Message, or use the keyboard shortcut Ctrl+N. The Mail window appears.
Table of Contents:
Addressing
There are three ways to address an email message to someone: in the To: list, in the CC: list, and in the BCC: list. People listed in the first list are the main recipients. Those listed as "CC" are receiving the message to keep them informed, but aren't the primary targets. Those on the BCC list get a copy, but none of the other recipients see the BCC list, so only they and the sender know they've been copied.
By default, Email Responder doesn't show a BCC area. If you would like to BCC someone, just click the Options Tool Bar button and choose BCC.
The window will update to show a BCC area:
You can add an address to any of the three address fields in two different ways. You can simply type an address or a list of addresses into the fields. If you enter multiple addresses, separate them using commas or spaces.
The other way to add recipients to your message is to use the Contact List. Email Responder uses its own Contact List, not the one from Microsoft Outlook or another mail program. To use the Contact List to address your message, click either the Contacts button in the tool bar, or the To:, Cc:, or BCC: button. All of these open the Contact List window.
To choose an address from the list, simply select it, then click either the To:, Cc:, or BCC: button to add the address to that list.
You can quickly jump to an address in the list by typing the first few letters of the address. For instance,if you type sam the list will automatically scroll to the first address that starts with those letters, for instance samantha@somedomain.net.
You can also filter the list. For example, if you type yourcompanyname.com in the Type Email address to search field and press the Find button, only addresses that contain yourcompanyname.com will be shown. This can be a good way to send mail to everyone from a particular company. To remove the effects of the filtering, click Reset Filter.
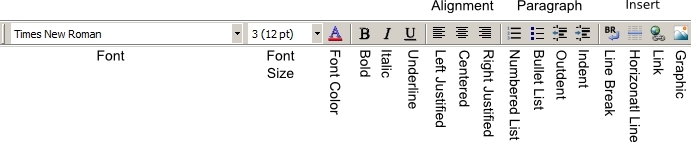
Typing and Formatting Messages
The mail window includes a powerful text editor that can create messages either in Plain Text format or in HTML. If you select Plain Text, your message can contain no formatting (no fonts, no boldface, no italics, no color, no tables, etc.). The advantage of plain text is that it is compatible with any mail program, and that some people dislike receiving highly-formatted email. You can set a default message type in the Email Responder Settings. If an HTML message is received and quoted in a reply, Email Responder will create an HTML reply.
You can switch a message between HTML and Plain Text using either the Format menu or the Mail Format Tool Bar button.
If you choose to create HTML mail, you can use the formatting commands to make your replies more readable.
The text editor can display a table if one is present in quoted text, but does not have the ability to create or modify tables itself.
Attachments
Email responder lets you attach files to your messages. If you are forwarding a message, the program will automatically forward any files that were attached to the original message. Replies do not include attachments from the original message.
To attach a file, just click the Add Attachments ( ) button in the Tool Bar, or Insert, Attachment. The Add Files window opens. Browse to the file you would like to add, select it, and click Open. After adding at least one attachment, an Attachments area appears in the window: ) button in the Tool Bar, or Insert, Attachment. The Add Files window opens. Browse to the file you would like to add, select it, and click Open. After adding at least one attachment, an Attachments area appears in the window:
To remove an attachment, simply select it and press the Del key on your keyboard, or use Edit, Clear.
Automation
Templates
Email Responder's Templates let you answer questions faster two ways. The standard text saves you from having to type the same answer over and over, and the Smart Fields automatically enter customer and product information for you. In many cases, you can answer a customer question simply by choosing a Template and pressing Send.
This section discusses using Templates. To learn about creating and editing Templates, see Templates Settings.
To use a Template, first create a message, either a new message or a reply. Once the message is open, click the Templates Tool Bar button. A list of Templates appears. Select one and it will immediately be entered into your message.
If the list of templates is long, you can move quickly through them using the keyboard. For instance, to "jump" to the templates whose names start with "m" just press the "m" key on your keyboard.
This sample shows a typical Template:
Notice the two Smart Fields in the message. When the Template is inserted into a reply, "<<Full_Name>>" will be replaced by the customer's full name and "<<Product_Support_URL>>" will be replaced by the URL for the product's support page on your web site. There are many other Smart Fields available when designing Templates.
A message is fully editable after adding a Template. It's even possible to combine multiple templates in the same message if a customer needs both. If you do add multiple templates, you may need to delete repeated parts (like "Dear customer") that are present in all the templates.
Product/Service
Some Smart Fields depend on the specific product or service selected. For instance, the Product URL will be different depending on which product is being discussed. Email Responder will intelligently deduce which product the customer is interested in based on the Subject and text of each email message, but for new messages (not replying to an existing message) or if the product or service being discussed isn't obvious, you will have to select one. Click on the Product/Service Tool Bar button, and choose from the drop-down list.
Only one product or service can be selected for any one email message. If you are answering questions about two different products, you will have to manually type information about the non-selected one.
Accounts
In Email Responder, you can choose what the "From" address on your mail will be by changing the Account. For instance, if your job includes answering both pre-sales and support questions, you can switch between the sales@yourcompanyname.com and support@yourcompanyname.com accounts simply by clicking the Accounts Tool Bar button and choosing from the drop-down menu:
Whatever you select here will appear as the "From" address when your customer reads your message.
Signatures
Many organizations use standard signatures for their customer service mail. For instance, one signature we use at DeskShare is:
Thank You,
DeskShare - Support
http://www.deskshare.com/
By creating a single signature in the Email Responder settings, the company can make sure that everyone uses a uniform closing while saving typing time for everyone. Another advantage is that if information in the signature changes (for instance, a new phone number or web page) it can be changed once, and all new messages will automatically include the updated version.
Each Account can have a different signature associated with it. For instance, DeskShare has has different support accounts for our software publishing business and Video Desk, our video hosting web service. If one of our representatives is sending mail from the support@videodesk.net account, the signature used for that message will automatically change to one that is appropriate for that service.
Signatures are created and assigned to accounts in the Mail Format Settings.
Send
When you are finished creating and editing your message, click the Send Tool Bar button.
Depending on the settings of Email Responder Manager and your company's mail server, there may be a short delay before the message is delivered to the customer.
|